Saturday, 20 April 2024

Growing ginger & other things at home ...

 I freely admit to being  a serial grower; there is always a pot of something growing on a sunny windowsill. It is often the base / crown of celery which easily spouts in shallow water then can be grown on in the covered Elho planters against the house. 

The planters already have some potted tomato plants being grown up & hardened off to be planted out mid May once it warms up & the risk of frost has gone. 


There is also some sunflower seeds growing on to be potted up - the birds peck them if they are grown outdoors initially. 

I have had little success with growing ginger; however, I saw a suggestion some months back online that advocated putting the root in damp kitchen paper in a plastic bag in a dark space & leaving it until it grew eyes. I duly did this with a root bought alongside my shopping. I cut it in to several pieces, wrapped each loosely in kitchen roll, dampened it & popped them in a sandwich bag. This went in the bottom pot drawer in the kitchen,  balancing on a sieve. 

I admit to almost forgetting about it, then noticing that the paper towel had purple colouring (from the roots) and other than checking it was still damp (it was) I just left it. I put an avocado pip in another bag with paper towel & left that too. 

I had a look this past week & the ginger had well developed eyes & some roots too so I have potted them on in a container. The suggested method is not to bury them but to lay them on the surface of the soil. Because it is still cold,  I spiked two sticks in the pot & wrapped bubble wrap around the pot, poking the bubble wrap on to the stick tops to form a little hot house. 

I am hopeful that this batch might actually grow but it is early days yet. Any suggestions to successfully growing it? 

The avocado pip was checked & it has a root growing. In Southern Africa we grew them as houseplants by starting them off with match sticks stuck in them but I have not had much luck so will give this one a bit longer on the sunny window sill before potting it on. 

I also have a lemon grass rooting in a glass on the windowsill - that will be ready for potting on this week & again in a warm bubble for a while as it grows on. 

I love the challenge of growing things; I hope you do too. 

Thank you for your company, please stop in again soon, 

Dee ๐Ÿซš๐Ÿซ›๐Ÿชด๐ŸŒฑ

Friday, 19 April 2024

A little drawstring bag for a baby gift

Little ones need little bags to keep their little toys & teething bits in where it is more hygienic. 

I made a little Beatrix Potter bag last year & it was well received for carrying around teething shapes to keep them away from the general things in a handbag. 

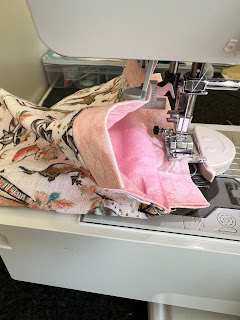
With a bit of free time today I decided to do another bag for a gift. I rather liked the animal fabric as all children seem to get on with animals & patterns that are not too busy. I picked out a plain pink lining fabric & a lightly patterned pink fabric for the drawstring additions.  

This one has turned out taller which might not be a bad thing. The animal fabric is pretty & I thought with a pink lining it would be well received by someone with an interest in animals.  I love these gentle shades of fabric that I use for the drawstrings. 

Because it has been some months since I made the last one, I did have a moment when it went wrong & the unpicker had to come out to take out a seam. However, that happens to all of us at times so it is just one of those things when you do it off the top of your head. 

I might make a few more as I know of several new babies who need one too, perhaps best while the  process is still clear in my mind. 

Do you have any creative projects on the go? Tell all ... 

Thank you for stopping by & taking the time to visit, 

Dee ๐Ÿงต๐Ÿชก๐Ÿ“๐Ÿ‘ถ

Sunday, 14 April 2024

#4 Free motion embroidery circular nest alternative


I love having free time & this morning, a lazy Sunday, I had written up my previous circular stitching woollen nest for April, I had a niggly thought of a different way to do it in my head. Why not try out the alternative even though the first one is done & edged? 

This is a circular stitching project & other than some couching of the 'nest wools' & the edges, there was little stitching. I had a thought in my head from when I did a 3D free motion embroidery course that would work rather well as a nest. I have used solvy film in another project too & understand that the threads have to overlap because that is all that hold it together once the water soluble film is washed away - an interesting challenge. 

I have 2 sewing machines set up in the spare room - my trusty 20 year old basic Toyota does not have drop feed dogs which is not ideal but the feed dogs are covered by a plastic plate for free motion (so the work can glide / be guided by hand only). I had to modify (sand) a wooden hoop so it would fit more easily under the free motion foot once attached & it works well (with red marker to show where to slide it in & out) 

I have experimented with various free motion feet & have a selection - some working easier than others. Last year a friend was selling her electronic Brother machine, the very model I had been looking it, so I bought it from her (she was upgrading to one that could do patterns for commercial work) & it is a dream for stitch choice & it does basic lettering too. 

However, the new machine, while the feed dogs drop easily, has a smaller working space & it is lower so there is less room to maneuverer an embroidery hoop by hand. However, having 2 machines, means that one can be set up with the right free motion feet & plate so that makes it quicker to try things. 

You can see the difference in the working space between the machines. 

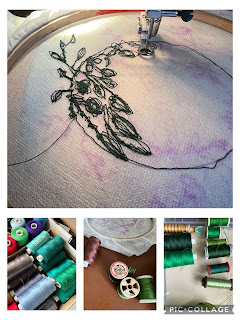
This morning, acting on my inspiration, I added some Solvy film to my hoop, traced the 4 inch circle on to it & drew in some details of ivy like vine leaves. I drew some leaves outside the circle, as well as at the bottom & the top with the idea of bending them over to hide the nest part of the sewing with an additional layer.  I should have used the frixion pen as this sewing one didn’t give neat lines but it was ok in the end. 

From the course i did, I remembered to select various shades of greens to give the work depth, threaded up the machine, then lost several hours to the immersive time of free motion embroidery. (Changing bobbins is easier on this one for free motion as the work can be kept in place while you do it) 

Bundling up some green silk threads from my late mother in laws stash that were too fragile to be sewn with, but were perfect for a nest. I pulled some off, put it between two layers of Solvy film then just ran a few machine threads over it to keep its shape. 

The stitches have to loop over each other, circular motion works well because it holds the threads together when the work is dipped in warm water & the water soluble film disappears completely. The threads give it structure but they can be manipulated in creative ways which is what I enjoy.

It is so easy to get lost in this process & once I got on to the second green thread, I could see my outline sketch was taking shape & it felt more ordered.  Several other thread changes & I decided it was done. 

Changing the cotton to blues, I decided to do the egg shapes suggested in the brief in machine embroidery. Because the section was so small, I doubled over the film & just held the edges between my hands to give it rigidity. It worked but it did snag a few times. 

The moment of truth - taking it all downstairs to the basin & draining board - will it hold its shape? Have I joined the sections enough & was my design appropriate for the sewing? 

The silk threads held in the simple outline, the blue threaded eggs kept their shape - the largest one to be dipped last ... 

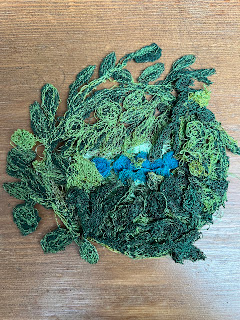
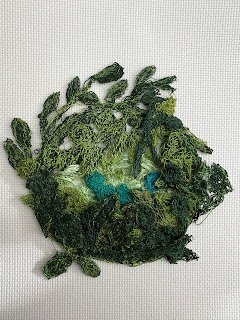
Phew, the film dissolved immediately leaving a very good outline of a hedgerow of leaves & a good circular shape. 

I lifted it out, it still felt sticky with the film, so I changed water & dipped it again, then placed it gently on a clean tea towel to dry. 

I pinned the nest shape to a piece of polystyrene (as we had done on our course) to hold its shape. This also made it easier to fold over the tendrils that I had made outside of the circle. I am rather pleased with how well they flipped over & on to the circular shape. I pinned them in place to dry. 


I love doing courses in new techniques because they give you confidence to return to them. This free motion shape has challenged me in the design but I am rather pleased I went with something quite different.  

Hmmm side leaves curled in or left out? What do you think? 

What to do now seen as I have already hemmed & edged the felt nest? Perhaps I will add it to the reverse of that panel  as the alternative or  perhaps I should add it to my 100 day sewing roll that is not making as much progress as it should ... 

What do you suggest? Give me some ideas please. Thank you for your company, inspire me with your projects. 

Dee ๐Ÿชก๐Ÿงต๐Ÿชก

#4 Mid Spring is circular nesting time …


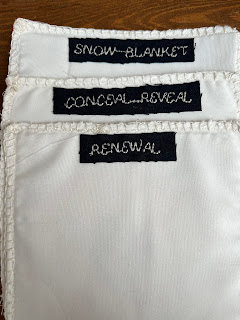
Thank you to those who have followed my Circular Stitching progress. It is a year long stitch along with a new prompt given at the start of each month. 

The size is a uniform 6x6 inch square with the circle being 4inchs. It has a Facebook group & the leader gives the prompt & suggestions then it is open to interpretation. 

The first 3 were 

Snow blanket 

Conceal & reveal 

Renewal

This months is Mid Spring - New life 

The suggestion was a circle that was half nest half free with 3 oval eggs. 


I used some wool to depict the nest materials but being a lover of felting, mine just seemed to naturally become a felted nest. Fortunately I have a good selection of roving wools & other felting wool that I can use for inspiration & to felt with. 

We do not know how the 12 panels will be assembled at the end & this one chunky nest might be problematic but we will cross that bridge when we get there.  The fabric for the fronts were all cut at the same time from an off white linen so that there would be a uniformity to the finished product. However, I find the linen leaves threads on the edges & with the instructions saying the edges need to be firm at the end, I have opted to sew a row of machine stitching then the blanket stitch to give it more strength. 

The edges were machine stitched to the backing on 3 sides, the stiffner shape was inserted, the 4th side stitched then it was blanket stitched by hand all around as per the instructions.  I will still do a machine embroidered label for the back, but it is easier when there are a few to do. 

I bought a large roll of creamy white thread at a charity shop & am keeping it in the container for this project which will give a uniformity to the end product. It gives a neat finish & the line of machine stitching near the edge helps the edges from fraying too much. 

I am rather pleased with the effort so far, I know there are things I would change but sometimes I think it best to just go with your gut. However, the bulkiness of the nest might be a problem when the final 12 pages are assembled so ....   I hope you have enjoyed this challenge, thank you for your company, 

Dee ๐Ÿงต๐Ÿชก๐Ÿ“

Friday, 12 April 2024

Lilleshall Abbey on a sunny spring morning ...

Returning from some shopping in a local town, I passed close to my favourite Abbey & just had to stop by.  

You are familiar with it too from previous visits I have shared in 2016, mid 2023 

The gates to the entrance are locked from the end of October until the start of April each year but there is a pedestrian gate you can walk through & down the very muddy road to the Abbey. We have done it several times but you have to have wellies on & so I tend to skip in the wet weather. However, I was mindful all week that the entrance will once again be open to vehicles & so I turned to return home passed the Abbey. 

BLISS - I was the only car in the little road & so I walked amongst the quiet ruins, feeling the deep calm & peace that this place brings when it is quiet. I love the silence when alone there, the history of the Abbey so evident & solid. 

It was founded in 1148 by the Augustinian canons known as black monks for the colour of their robes. They followed a monastic rule but preached in the wider community. They gathered in the choir seven times a day for prayers so this place would have had rhythm to its daily rituals, a sense of calm, reflection & quiet.

The tiny tower in the nave with its narrow stone stairs has to be negotiated carefully when you are alone because they are dark as it curves around but the breeze & view is so worth it, especially when it is quiet. 

I know from reading various sources that we can give & receive energy & I always feel this space radiates calm & peace, as it should, given its history as an Abbey.  It was closed as an Abbey in 1538 as part of the Suppression of the Monasteries.

The Abbey is sited west to east with the enormous Presbytery window now only having the stone outline. In its time it would have been so impressive the the crossing points leading to the Sacristy where the sacred vessels & garments were kept. It was used as a robing room for the  Monks. 

The Sacristy leads to the Slype / passage; it has a heavier atmosphere in there with its low vaulted ceilings & double entrance. It was also the passage to the canons infirmary. 

Monks could meet there & converse without breaking the rule of silence. The outer wall of the slype backs on to what was once the Chapter house. More than 20 burials have been found in this space, it was  previously open but has been recently fenced off as it is so uneven but there are several headstones there & perhaps this is why the slype / passage feels more heavy.

The heavily carved processional arch led from the cloister to the Abbey church, the cloisters in this area are long gone with a massive yew tree in its place. The heavily decorated arch dates back to the 12th century, layers of time. 


The site of the cloisters & Abbots hall & chambers is long gone with just a few stones showing the outline. 

The whole site has an impressive stone wall that greens up with moss in winter, giving it a gentle look that blends in very well.

I loved walking amongst the quiet ruins once more & hope  you have enjoyed my potted history of this special place, the space that still fulfils its spiritual duty, centuries later; perhaps only to those who feel & listen. 

I hope you have a space like this to visit & reset, when you need to quiet your mind ... 

Thank you for your visit, you are always most welcome, 

Dee ⛪️