Saturday 25 May 2024

Re-reading some books ....

The lighter nights are fabulous with longer evenings & warmer weather after a really grey winter. While tidying my books, I came across this stash again. I love to read & have been re-reading some of the books of the author Khaled Hosseini that I first read more than 15 years ago. 

The Kite Runner is often quoted - it is such a deep & beautiful book. 

And that's the thing about people who mean what they say. They think everyone else does too. 

There is only one sin, and that is theft... When you tell a lie, you steal someone's right to the truth. 

For you, a thousand times over 

But better to be hurt by the truth than comforted by a lie

Words were secret doorways & I held all the keys 

I am now reading And the Mountains echoed for the first time - sometimes it is enlightening to read a clutch of books from the same author at the same time, because the words just flow as they paint pictures in your mind - that is what good books do ... 

Hubby lived & worked in many of the countries mentioned as part of his engineering consultancy work so the images & time periods are something I can relate to personally. Many of the events described in A Thousand Splendid Suns happened in recent times & it is interesting to have this perspective.  

It is one of those books that at times you just have to put it down to process the words described .... 

What are you reading & what do you recommend? 

Dee πŸ“šπŸ“–πŸ“™

Tuesday 21 May 2024

Calming Green ‘Forest bathing’ garden

The annual RHS Chelsea Flower Show has featured several winning gardens focused on green plants & structural plants like ferns, trees etc


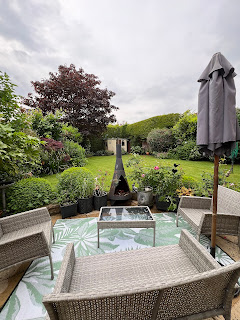
I have made a concerted effort to plant a lot of green plants so that our garden retains its structure through our long winters. 

All of our back windows look onto the garden, framed by tall hedges & evergreens so it is pleasing to have a good view throughout the year, even in dull winter light. 


The large topiary balls are 25 years old, grown from topiary that was in the Dorset family garden. They are much loved ... 

There is a variety of shades of green as well as different leaf sizes & shapes & it retains this structure all year which makes it a welcoming space.  We have several David Austin roses - they have just won their 28th gold award at Chelsea. The rose against our house is Shropshire Lad & we also have the Jubilee & Elizabeth rose, bought in honour of our late Majesty. 

In Spring & Summer, there are pops of colour from bulbs, annuals & shrubs which are like little bursts of interest. This is balanced by several white flowering shrubs because they show up in low light at night. 

I studied the RHS Chelsea gardens & feel rather pleased that our garden is on trend & somewhere we love to be in; the intense greens are very calming & the hedges are the perfect backdrop to the space. We are blessed ...

Are you inspired by other gardens ? Tell all 

Dee 🌳🌺πŸͺ»πŸŒΉ


White plants at night ...

 It is always interesting to me to watch the night draw in, to see the garden fade in the light & to see what remains. 

I made a conscious decision to plant some white plants about a decade ago because they are like little punctuation marks in low light in the garden. They are a hint of shape & colour. 

Lilac is wonderful with the cone shaped flowers & the heady night scent. 

Clematis is always a welcome sight with its abundance of flowers & the other plants name eludes me but it puts on a good display in low light. 


What is your gardening preference & can you recommend some white plants that are hardy but pretty?  

Look forward to some recommendations, 

Dee 🏑πŸͺ΄

Monday 20 May 2024

Local Roman history at Wroxeter

 The village of Wroxeter in Shropshire sits near the River Severn & not far from our county town of Shrewsbury. It has within it the remains of the Roman town of Vivoconium, which was once the fourth largest Roman settlement after London, St Albans & Cirencester. 

I often take visitors to the Wroxeter settlement, our closest Roman one & so have visited it many times. 

However, being in the vicinity on Sunday, we took the opportunity to visit the nearby St Andrew's Church at Wroxeter, which is a short distance from the ruins. 

I knew that it contained stones & columns from the nearby Roman ruins & it did not disappoint. Two Roman columns grace the entrance gates, the font is also carved from a column & there are several parts of stones being used in the exterior.  

The church itself is noted in the Doomsday book of 1086, which catalogued all land & buildings at that time & it is still a reference document. 


The impressive font was said to be carved from a pillar from the ruins, & Emperor Hadrian visited Wroxeter too, probably en route north to build his infamous wall on the boundary of England & Scotland. 

The church also contains impressive tomb monuments & references to the Newport family who were Royalists during the troubled times under King Charles 11. 

The Wroxeter Roman settlement is managed by English Heritage. The nearby Roman Town house was built in 2010 by Channel four as part of a project using only tools & techniques available to the Romans. It was a fascinating series & the townhouse is an interesting visit, looking out towards the Severn River. 

Watling Street passes between the two sides of the Roman Ruins - it was the main Roman Road that ran the length of early England.  Much of the A5 road follows this route & it passes close to our house as it enters Shropshire on the way to the port at Holyhead. 

After reading the guide book for the church, I think another visit is on the cards to absorb it all. 

I hope you have found this as interesting as I did, there is so much history around us, layers of it & we are the richer for it. 

Thank you for stopping by, it is always appreciated

Dee πŸ›️⛪️


Sunday 19 May 2024

#5 Blossom time in the circular stitching challenge ...


 This is the 5th of the monthly challenges titled Late Spring, Blossom Time. 

The project uses a uniform format of 6x6 inch squares with 4 inch circle. They all have to be strengthened & bound with a sturdy blanket stitch. The organiser has not yet disclosed how the final project will be put together but I'm sure it will be fabulous. 

The technique is set out in the first blog on it - 

Snow Blanket 

Conceal & Reveal 

Renewal 

New Life & an alternative one 

The fifth being Blossom Time in late-Spring.

The brief was to make a tree & then add lots of pink blossoms to it, keeping within the circle. 

I made several attempts at the tree before I was happy with the shape & colour. In my mind, the tree was meant to be the easy part but it needed some thinking through. 

When looking through my fabrics for some pinks, I found this one with blossom like patterns in various shades of pink & knew it would be perfect. I duly cut out some, pleased to have the variation in colour. 

I find the variegated balls of Coats threads to be extremely useful - I often pick up an interesting ball in a charity shop to add to my collection. 

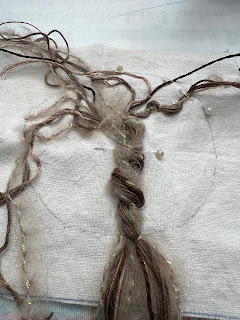
The tree was made from a selection of wool & various shades of brown threads, loosely wound together & placed on the circle. The suggested braiding did not look right but the loser shape was better. 

It was couched in place in a few places with the threads thinned out as the reached the edge of the circle, as a trees branches would. 

The cut out pink blossoms were more fiddly & I did a few open & the folded the other in various ways, before securing with stitching on to the tree shape.  The branches needed a bit more definition so I used 6 strands of two browns, separating the stands before using them as that gives a more uniform colour.  It was just what was needed as the branches had receded with the blossoms on them. 

The base needed something & I used more Coats threads in a vibrant Spring green. 

I think it worked out well according to the brief.  The backing was again machine stitched to the front on 3 sides with stitch 47 on my machine (I keep forgetting which edging stitch I used hence naming the number) . I trimmed & inserted the stiffening square as done on the previous ones, then stitched the last side closed. 

I decided at the beginning to keep a uniform look across the project so cut enough, front, backing & stiffening fabrics for all 12 the challenges. I also bought a large ball of sturdy off white thread to be used to blanket stitch all. I duly did the stitching on this 5th one & it can now join the others in the container. 

The new challenge is revealed on the first of each month so I am pleased to have this one completed. I still have to do the machine embroidery names for the back but will do that with the next one as the names are just glued on the back with fabric glue. 

I am rather pleased with this one, something completely different to what I usually do but that is how we grow as stitchers .... 

Thank you for stopping by, do you have a project to share with me? 

Dee 🧡πŸͺ‘πŸ“

Friday 3 May 2024

A harvest apron gift

 I have not made an adult gift for quite a while but had come across a suggestion that I knew would be a perfect gift for someone who has an allotment. 

The harvest apron is a double apron with a larger front pocket that can be adjusted to hold allotment harvest without having to carry a basket. 

I did some research & some of the suggestions are rather large which wouldn't suit someone who is petite so I made my own notes & did adjustments. You tube has several videos that suggested the apron could be made quite quickly.  I was much slower than that because I was working out the process. 

I used earthy colours because it will be used on an allotment. The contrasting fabric is perfect to add some interest & it was the same fabric weight. 

You need fabric for the main body (2 pieces or one folded double) 

A waistband, two ties, a loop, ties for the apron part (I used a soft ribbon)

I pressed as I went along because I wanted a neat finish. 

* press over the fold over / harvest part of the apron, fold again & press again. Find the centre point & make a button hole over the fold. This is where the tie will come through.

* sew the two side seams of the apron, leaving about 1.5 inches at the top for the waistband part to be attached 

* trim the side seams with a pinking shears then encase the seam as a french seam. Press 

* make up the two straps on the waist band - right sides together, sew, trim,  pull it through then press & top stich all around the ties. 

* make up the centre tie that will attach to the waistband & hold the ties from the front apron, press all

*gather the top of the back apron to the waistband size (this one was 25 inches for a petite person). I only did a single row of thread for the apron gathering  & that worked fine. 

* The apron top is sewn then encased in the waistband which was quite fiddly to make sure the apron, ties & loop were all lined up to be encased in the waistband. 

Of course, the bobbin thread ran out before the last top stitching line so I had to redo the bobbin. This Brother machine has a top drop in bobbin so you can see the amount of bobbin thread which is useful .

After much pressing & stitching, it was a final press & snipping of loose threads - then ready to be packaged as a gift. 


I like the earthy colours of the fabric & because the apron seams are double sewn as a French seam, it will be hardy enough for regular use & to carry produce on the allotment. 

I hope it will be well received & well used. Perhaps I will make another to improve the process & smooth out the little snags I had to unpick. 

This would be well received as a gift for a keen gardener too, or for someone with hens & they need to collect eggs etc. 


Pressed & folded in to a fabric bag that can be reused for seeds etc. 

I hope I have inspired some to have a go at something else.  Thank you for stopping by, commenting & sharing the blog. 

Dee πŸͺ‘πŸ“πŸ§΅

Thursday 2 May 2024

Little pancakes with apple

 I do love a quick pancake & sometimes, it is a spur of the moment thing. 

Today was such a day - with fruit to use up in the fridge & a slower morning, I quickly cut fruit & made up the pancake mixture. This is the recipe my late mother always made - I have shared it before but here it is again. 

I always just mix with a whisk & a bowl 

1 cup of self raising flour 

1 egg 

5/8th cup of milk (about 150-175ml) 

a little vanilla extract if liked 

Whisk together, adding a little milk to the mixture if it is too thick. 

Heat the pan & turn it down to medium. Drop tablespoons of the mixture on to the pan & wait until it bubbles then flip over - it is less than 1 minute each side. 

For the apple ones, I cut half an apple in to thin pieces (skin on still) and then as the first side of the pancake was cooking, I added the apple pieces to the pancake, let the bottom side cook then flipped it over. Watch that the apple does not brown too much (turn the heat down if needed) 

Serve the pancakes with fruit,  yoghurt or anything you fancy. 

They really do take less than 5 minutes to mix & a few minutes to make. This mixture makes about 9 (of the size shown in the photos) and the mixture can be doubled. 

Best served hot with orange juice or a tea or coffee. 

Do tell if you make them & what you put with yours.


Thank you for stopping by, 

Dee πŸ₯ž