Showing posts with label hand sewing. Show all posts

Thursday, 28 November 2024

Starting some Christmas sewing ...

Is it just me or has December come up rather suddenly? It seems like summer was just yesterday ... 


I have been catching up with a week long online sewing retreat with something like 20 workshops so have been completely distracted & the end of November is here. 

Two years ago I made some soft & colourful fabric decorations for the little ones tree - soft with longer hanging loops to make it easier for little hands to handle them. They did not have a many embellishments sewn on which could be put in the mouth so safe for small people. 

I was asked by a friend to gift one to her & so I did another selection of Christmas decorations with interesting beads, little bells & more that I gifted to friends with their Christmas cards.  I handstitched gold or red edges to them all & they were well received. 

I am meeting friends / colleagues soon & wanted to add a handmade decoration to their cards too so having some time, I cut out some trees & a few tiny boots again. I still had some patchwork sections in my Xmas fabric stash (everyone has such a box do they not? ) so I cut an additional 2 trees too. 

All of these are backed by soft red or green felt / flannel.

My process was the same as before - machine stitch around the edge (in red or green thread) then keeping it on the machine, with the needle in the fabric, lift the presser foot & stuff it lightly with soft toy stuffing. I used a wooden quilting creaser & pointer to poke some stuffing in. The rounded edge was useful to ease it in, then the pointed tip could push it to the corners etc. 

Then I simply dropped the presser foot & sewed up the last bit - an easy way to do it as long as you leave enough space to pop the filling in. 

Because these few are for adults, I will add some tiny bells, beads & then blanket stitch the edge in embroidery thread. 

They are well received as gifts & it is a relaxing activity to get one in the spirit of the festive season as it is fast approaching. I know - I should have started sooner, however, they are lovely to make. 

EDITED - some completed ones that are ready to go with cards. 

Please tell me how your preparations are going. Thank you for stopping by, it is much appreciated. 

Dee ๐Ÿงต๐ŸŽ„๐Ÿชก๐Ÿ“

Saturday, 28 September 2024

I am finished Picking up the Pieces (I think) ...


At the start of September, I was so fortunate to join the lovely Christine of Gentlework in a days course entitled 'Picking up the pieces'. 

This is what our day was like as we spent the day using up little pieces of fabric The time passed way too quickly, as it did on the previous workshop I did a decade before in our county town of Shrewsbury. 

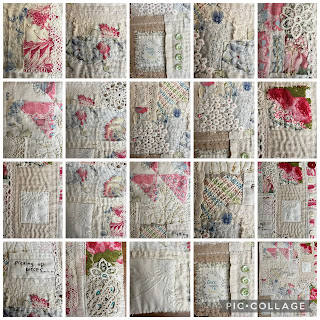
The whole idea is totally indulgent - the spend the day creating a panel for no reason other than to inspire us - how fabulous is that?  This is some of the completed details ... 


I had positioned all my fabric bits & stitched them down at the workshop & have since then spent hours adding in the details that I really like. Hand sewing is a meditative process where you just concentrate on adding in details. It is a very creative experience because you have to draw from your stitch knowledge to find the ones that  will suit that section. I have my favourite stitches & sometimes simple is often best. I am fortunate to have a good selection of buttons that came from my late mother in law who was a very accomplished sewer but always with a purpose. I have used some of her vintage buttons & silk threads in this piece. 

I like the pieces to have some form of continuity & so added similar colours or finished the shapes with obvious stitching that completes it - old & new evident.    


  I also like merging fabrics to create something new (on the triangles at the top left) and the square pink on the top right. The lace, buttons & beads were vintage. 

I fortunately had several cards of vintage silk threads that were used for stockings. I used them in various thicknesses. 

The soft colours of the vintage silk threads were the right colour to pick up the pinks & blues of the patterns & to provide continuity across the sections. 

I also used vintage & modern threads in the stitching. 


One thing I noticed 10 years apart - the blue fabric looks identical to the one I used on my panel I did in 2013. Do you agree? 

It is very enlightening that I used the same / a very similar blue & pink fabric swatch to complete both panels. Perhaps we are just drawn to certain combinations ... 


The cow parsley flowers are a new one for me - I looked it up & think they look perfect filling in the space from the lettering to the triangles - they just look right in their muted shades with the tall stems reaching in to the space... 


The final part was to add a plain backing fabric & to blanket stitch it to the edges to give a neat edge. 

I fortunately acquired this lovely set of Coats Mercer - crochet threads recently. The colours are so lovely & they are in various weights / thicknesses which gives lots of options. I used one of these threads for the edge blanket stitch. It was the perfect colour in single strand because it did not distract from the panel at all, yet it held it all together. 

I think it is done, though I know that I might be tempted to tinker ... 


These are the stitches I mostly used on this piece, stitches I am comfortable with & which blend together harmoniously. 

I will probably sew loops on the back  & hang it in the room where I have all my sewing things. How would you display it? 


This is the panel from the start (top & bottom left) to the completed one. I like the pops of pink & the hints of blue with light touches of green - I think the colours go well together. 

Thank you for stopping by & sharing this workshop  stitching. I hope I have inspired you to do something for the sake of the love of stitching & creating. 

Dee ๐Ÿงต๐Ÿ“๐Ÿชก✔️

Thursday, 26 September 2024

#9 Circular Stitching - Seasonal Secrets

Month 9  of the 12 month circular stitch project & this one has been challenging, only because I had a lot of other projects on the go & didn't spend as much time on this one. 

The previous 8 challenges & links are in last months project if you want to pop over  & look ... 

The leaf shape with suggested shibori technique looked interesting but it is not one I have tried before & I think I will still have a go at it.  

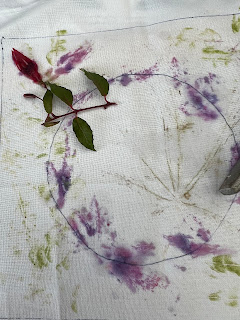
Some on the group had tried leaf impressions by hammering the leaf on to the square for it to leave an imprint but I did not find this too successful, some leaves are probably better at leaving an imprint than others I think. It might be something I investigate. Has anyone got any suggestions for this? My garden is still very much in the pink / green / purple colour range & so I decided to stay within this palette of colours. 

Again, it is all on a 6x6 inch square with a 4 inch circle in the middle to keep all of the pages uniform for the final assembly in December. 

My imprints did not work but hammering some fuschia flowers from our bush gave a blotchy outline. However, the garden is blotchy & messy at this transitional stage so perhaps I will leave those imprints? 

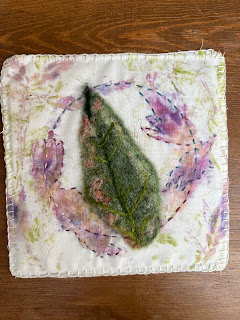
I decided to felt a leaf shape with leaves from our garden as inspiration. I have not felted in a few weeks & it was interesting to get to a shape that I was happy with. The yellow / cream / red markings are not as clear as I would have liked but it worked in the end. 

I then jabbed it on to the background fabric because linen is a good background for felting. 

An interesting challenge that I should have taken more time over but I can overthink challenges so sometimes it is important to just work the project until you get a result that you can live with. What do you think? 

Again it was finished off like the others with a row of machine stitching on 3 sides, the stiffening piece added in before the last side was machined. The edges were then blanket stitched using the same large roll of thread to give uniformity to all the pieces at the end. 

I will still machine embroider the project name for the back (my choice) when I have a few to do as that is easier for me. 

It has been interesting once again & I’m pleased to be done within the month.  I know we do not always keep up with the projects we sign up to so this is a good discipline for me to complete each in the time allotted so they do not bunch up & overwhelm. 

Thank you for stopping by, your visits are always appreciated. 

Dee ๐Ÿงต๐Ÿ“๐Ÿชก๐ŸŒณ๐Ÿก

Monday, 9 September 2024

Gently picking up pieces of fabric ...

 I am a great lover of expressing my creativity with a needle & a thread. In 2014, I spent the day in Shrewsbury with an inspirational workshop led by Christine of GentleworkThis was some of our work

Her own work is absolutely beautiful with precise stitches. She has an intuitive knack of placing fabrics & stitches together in a piece that is a work of art. Her work tends to be in a  muted, well worn palette of colours with beautiful lettering stitched on. 


I have followed her on Instagram & facebook for years & like many new mothers, she had a little break from workshops as she juggled many things. However, life resumed, as life does when a baby grows up a bit, and her work could continue. She shares images of her own work space & it is always so beautiful. 


I saw a workshop for 'Picking up the pieces' advertised & was delighted it was on a day I could make it. 

We will be picking up our fragments of scrap fabric, even the tiny ones, and piecing and patching them together into a quilted panel, adding lace motifs, buttons and stitched words.

Lots of materials will be provided but it’s also an opportunity to bring along and utilise all the precious (or non precious) scraps you have been saving and not known what to do with.

I sorted out some threads & fabrics but Christine assured me she would have plenty to choose from & she did. The drive out to north Shropshire is pretty, I should have allowed more time for a stop at Whittington castle, I will return on another day because it is a pretty part of our county of Shropshire.

Tea, coffee & cakes awaited us as we arrived at the lovely village hall with the stunning work set out as inspiration & of course, lots of fabrics to choose from. 


Christine had made up a little pack for each of us at our places - soft blanket as a background,  a selection of delightfully worn fabrics, lace & little bits to use as our starting point. It was beautifully presented in a little paper with a book page on the front & hand dyed fabric length to tie it all together. These little details shows the attention to detail & the thought that goes in to these workshops to make them so inspirational. 

There was a table set out with tins of buttons, cottons, fabric bits in all sizes & another table where we could share any bits we wished to donate to the gathering. I popped some vintage lace & soft cotton from an old table cloth on as my contribution. 


Examples of the beautiful 'Gentlework' she is known for - the stitching is exquisite & precise, the colours are worn & go so well together; it is so textural that you want to hold it in your hand & feel the stitching. 

It was not long before cups of tea were made,  cake sliced & we settled down to the familiar rhythm of  inspiration in the sewing. 

This is intuitive work - Christine circulated, inspiring, instructing, encouraging everyone.  

From the previous workshop, I know that 5 hours passes in the blink of an eye when there is much to do. 

I initially pinned some fabrics then thought - let's go instinctive, so I threaded the needle & made a start. I wanted to get the background blanket covered in fabrics that I knew I could come back to & stitch on or add small stitched fabrics too. I know that once the momentum is lost at home,  it is not as easy to pick it up & continue with the stitching. My approach works for me because while selecting & stitching the pieces down, my mind was already threading needles with cottons to add to the fabric shapes & patterns. I know that part fires my creativity. 


At one point, I had a gap that needed something with delicate pink & blue to tie in the top fabric & the pinks of the side panel.  As soon as I voiced it aloud,  several pieces were passed down & one was  perfect. That is the advantage of a workshop where we all encourage & contribute to the experience. 

I am pleased with my panel - there is much to be done still but I know the way forward because this point has so many possibilities. I have some beautiful inherited silk threads & vintage buttons that I will use at home because they will go perfectly ... 


The groups efforts were placed together on the table at the end of the session for us to take inspiration from. 

It is fascinating to see how we all started with a similar welcome pack yet every single piece was so unique. The approaches were what others were comfortable with; some completing a small panel, others doing the border with turned fabrics, others starting in the middle, some at a corner, all so interesting. 


I will share more of mine as I add to it but it was such an inspirational day with likeminded creative people that it reinforced why these workshops are so important. 

I was inspired by muted colours, with some faded pinks. The fabric from our pack had a pale pink & blue design that I carried through the panel, each person used this panel in a different way. 

I look forward to using silk threads to pick up those colours across the panel to unify the blocks. 


Thank you Christine - your work is unique & you are so generous with your advice, support & guidance. Do stop by again to see how the panel progresses, 

Dee 

PS - an update on this is at I am finished picking up the pieces


Thursday, 4 July 2024

#7 Circular stitching - radial symmetry

The 7th challenge in this year long stitching project made for interesting reading. Plants have radial symmetry & the challenge was to show this in stitching. 

Number 6 with the previous ones is here  

All of them have been interesting,  mostly out of my comfort zone but that is how we learn & grow. 

The suggestion was to use a crochet doily as the base circle but none of mine were even vaguely close to the circular size of 4 inches in diameter on a 6x6 inch square.  I have not really had to draw such a complex shape & so it needed thought - that is one of my strengths - improvising. 

Some early starters on the facebook group drew mandala's & embroidered those. Again, not an easy shape to draw on to fabric & I have not done mandalas before.

I found a mandala shape online, copied it to a Word document in 2 sizes, hoping one would be close to the right diameter & printed them off. 

How to trace it to the fabric?  I spied a pack of A4 freezer paper I had bought to experiment with but had not used so I scanned the sheet with the mandala's & printed it to the freezer paper sheet. It worked - phew. 

The instructions say iron the glue side to your fabric so that is what I did  & it stuck. A massive sigh of relief.

I have my embroidery threads sorted in containers by colours so I selected the pinks / purples / lilacs / greens & took them to the conservatory where the light is so good. 

It seemed right to select 3 colours for the flower shape & each colour was stitched, then the second & third. I used greens in the centre & around the inner circle shape, then a different green in  running stitch to give a lightness to the outer edge.  

The little circles were going to be French knots but they were lost in the shape so out they came & satin stitch worked just fine. 

It was finished in just a few hours - a relief as it was a shape I did not know how to approach first of all. 

I am especially pleased that the back is almost as neat as the front & that is a big deal for me as I am not a neat embroiderer. My Mother's used to be almost the same on both sides & I was always in  awe of her skills. Mine is improving & that is good. 

I still have to stitch it to the back panel, insert the stiffener & then finish up the fourth side. I need to machine embroider the names of the last few months for the back of those - white thread on black to match the others. 

Do you take on random challenges that are out of your comfort zone? I was not sure I would manage to do this year long one each month but having a month to do each one has made it manageable & more importantly, it has challenged me & that is always a good thing. 

Thank you for stopping by, your company is always much appreciated.

Dee 

Sunday, 18 February 2024

An embroidered Spring bouquet

 It feels rather lighter, brighter & spring like at the moment. I have been enjoying my half term break from tutoring. I always love to have  a project to finish over this break & saw an embroidery project in a group I follow. 

I downloaded the pdf, printed it off (unfortunately at 89% size as I did not increase the printing size) then traced it on to my hooped fabric with a frixion heat pen. 

I had invested in a hoop stand last year & it is so useful for embroidery as you have your hands free to perfect the stitches. 

It was 2 one hour long stitch along sessions & what a pleasure to be able to come back to the recordings & to do it as time allowed. I used fabric & threads I already had which is always good. 

I have not done a stitch along session in a long time & it is very useful to learn new stitches (wheat stitch) and perfect some of the others (loop stitch) 

I did it at the start & end of the week, fortunately just leaving it all on the conservatory table so I could come back to it. 

The colours were largely what was suggested by our brilliant tutor & I used the closest matches I had. I prefer to keep the threads I am using on a tray near me & I also use several needles all threaded at the same time - personal preference. I love using long sashiko needles because the eye of the needle is large & it is the same size as the needle so it glides through the fabric easier. 

My hoop stand with the small clipboard was prefect to have the diagram clipped on & I had to work next to my laptop to follow the recording. The Frixion pen is perfect because the ink disappears as soon as heat is applied. I usually iron the back but the tutor used a hair drier & it works perfectly & so quickly - a great tip from her. 

I am pleased to have finished it & will probably add it to my 100 day sewing roll now that it is finished. 

I am always so thankful to the generous people who run these workshops & who give their time & skill freely - it has improved my skills so much ... 

This is a good selection of basic embroidery stitches if you need a quick reference. 

Thank you for stopping by, your visits & comments are always appreciated. 

Dee ๐Ÿงต๐Ÿชก๐Ÿ“

Thursday, 1 February 2024

#1 A circular stitching project …

 I know, I know - this is the second project I have on the go, alongside my 100 day one which is making progress & I will post an update soon. 

I am eternally grateful to artists & talented people who share their skills online & then encourage us to push our comfort zones. 

I saw this group mentioned in a sewing group I already follow on Facebook & was immediately inspired to join just before it closed to new members so that everyone would be at the same project stage - phew. 

The brief is eleven 6x6 inch squares that will have a different brief each month related to circles & the seasons. 

The first task, a snow blanket,  needed a 4 inch circle to be woven with fabric strips, then embroidered with a snowflake. The colours were restricted to white or creams. I find that restricted colours takes out the colour choice, leaving more time for creativity.  I cut or tore some fabric strips for the first part.

The fabric strips for weaving were placed on fabric stiffener, then they were ironed on to fuse them into a cloth shape. 

Once the 4 inch circle is cut, the circle is attached to the backing fabric - I machined it as I was late to start this section & I thought hand stitching the circle on would take too much time. 

The template for the circle was easy to do to make 6 lines, then embroidered in creamy white thread before being whipped with a slightly darker colour. 

I think the pearl bead finishes the top off nicely. Some French knots & seed stitches finished off the outer space. It still needs to be backed & a stiffener sheet put between the two layers. 

I admit to being rather inspired by this very manageable project & the project for February popped up - I can’t wait to start on that, it is a good one. 

Do stop by for an update & your comments are always appreciated 

Dee ๐Ÿชก๐Ÿงต๐Ÿ“

Monday, 13 November 2023

A nod to Scandinavian decorations ….

Is anyone else doing some sewing ahead of putting up decorations? I did quite a lot of handsewn decorations last year.  I saw this in one of my many books & it reminded me of making them decades ago. You need two fabrics ... 

I did  similar little woven hearts were with my Mother & Grandmother as a child but they were with paper which was probably easier as it was firmer. I came across the pattern in one of my many sewing books & decided they would look rather sweet as a decoration this year.

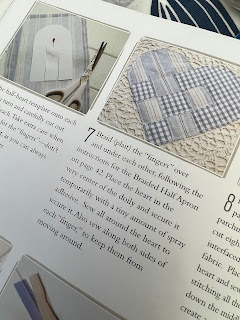
The little template is an easy shape with 2 cuts making 3 parts. You need two of these for each heart as they are woven together to make a heart shape.

I was out of practice & had to pull them apart a few times & redo them.

Once they were woven, I attached them to plain felt shaped hearts, then using my favourite blanket stitch all around the edge. A length of white cord was stitched in to the top so they can be used as a decoration.

I might make some others, perhaps using a stiffer fabric.  I might even do several different colours & make them to pop in to Christmas cards as a gift. 

What are your festive decorations looking like? Tell all & inspire us ... 


Thanks for stopping by, do comment & share please

Dee ๐Ÿงต๐Ÿชก

Wednesday, 25 October 2023

Slowly stitching some little Zen bags ...

I love the creative past time of hand stitching. I come from a long line of women who were dab hands at stitching. My mother, grandmother & great grandmother could knit, crochet, & sew clothes, curtains, hand furnishings, seat covers - just about anything. I learnt to sew on my grandmothers treadle singer machine & was absolutely delighted to inherit my great aunts hand singer machine.  It is that connection to making things. My embroidery is never as neat as my mothers was but I enjoy it never the less. My Mother did not have to look up stitches as I have to do, she just seemed to know how to do a wide range of them. I have favourite stitches - blanket, seed, running, back, satin, lazy daisy, french knots etc

Some of my threads I popped on the table - I like to limit my choices or I spend way too much time deciding instead of sewing. I love sashiko needles for hand stitching - their eye is the same size as the needle so they glide through the fabric better. I needed my thread wax because some of the threads kept unravelling & knotting - dragging it through the wax makes it glide through the fabric when stitching so it is definitely recommended. The thicker cords for the drawstring were threaded with the large tapestry needle. Does anyone else have a lot of needles with different colours when sewing? 


I always join the Zen creative retreats which are run several times a year. They are a week of 4-5 daily workshops with various creative things, many sewing based activities. This past one at the end of September came as I was preparing to go away so I made notes,  drawings & am slowly returning to the activities now.  I was drawn to making these little hand stitched pouches. The size is entirely up to you ...

I love using various fabric in a new & interesting way. This is then enhanced with free hand stitching, nothing prescribed, it is just using your intuition as you go along.  

I recently bought this gorgeous piece of fabric in a charity shop because of the colours that are so vibrant. I used bits of this on a plain white background - initially tracing a few paisley shapes on the fabric. The composition has a rather gentle look with the pale colours. The paisley shape does not show up too well but I do like the leaf shapes. I oversewed with one colour only to keep that gentle look. 

I was rather pleased with my effort so did a second one - same fabrics on a different white background & it turned out completely different. This time I stitched the various components down with a variety of stitches. I opened up the one shape in to a spiral & finished it off with my favourite blanket stitch edges. I am rather pleased with it - a little pouch for treasures .... 


I hope I have inspired others to put needle & thread to fabrics in a unique way. Please share your projects. Thanks for your company, you are always welcome here, 

Dee ๐Ÿงต๐Ÿชก