Showing posts with label Circular stitch project. Show all posts

Tuesday, 17 December 2024

#12 Circular Stitching - Sparkling frost finishes it off ...

 Thank you to all who have followed my Circular Stitching since January. 

The 11 previous ones are here with links .... 

The last one was Sparkling frost & I went a bit off piste & did not add enough sparkle which I will do this coming week with beads & silver threads. It can be done even though it is now bound. 

Paula has kept us all on track with the Facebook group offering support & encouragement. 

When I joined the challenge in January, I thought I would see how it goes because like many, it is not always easy to see something through to the end over a year. However, by releasing each project at the start of the month, you don't feel overwhelmed by it all. 

Because it was going to be a uniform 6x6 inch square with a 4inch circle on each, a back fabric with  a stiffener between the front & back layers then blanket stitched together, I cut all the parts plus a few extra & put them in their own plastic container.  I added the large roll of creamy white thread & needle for the blanket stitch edging & so each month, I just needed to get out the fabrics & I was ready to go. 

This preparation was essential for me because some months were busier than others & it helped to keep me on track. The completed ones were then kept in the same container. 

Some in the group embroidered the names on each one, I used the machine letters on my sewing machine & then glued them on the back. With hindsight, I should have done it on white fabric with dark lettering. 

When the last one was done, Paula shared how it was to be bound. 

The pages were going to be overstitched with blanket stitch, going through just the previous stitching, not the fabric. It was actually a really good way to do it & it is a neat construction. The idea is that the 12 pages forms 6 double pages in a star shape but it can be folded flat for storage. 

The final stitching was really quick to do in the same thread as the previous edging. I made a band to hold it together with a large button & some ribbon to wrap around the button. I am tempted to do a bag to drop it in to - I might still have time ... 

I feel I have accomplished what I set out to do & that is a good feeling of satisfaction. Some are better than others but I have stayed the course & that is important. 

My life long learning ethos embraces all things & this has been a great learning experience. Thank you for looking in on the process & leaving a comment. I hope you will be motivated to take up a challenge too in 2025.

Dee ❤️๐Ÿ“๐Ÿงต๐Ÿชก

Thursday, 14 November 2024

#11 Circular Stitching - Wispy mists

Like many, I am not the best at completing long tasks & when I joined this year long challenge, I had my doubts if I would complete the 12 monthly tasks.  I was buoyed by the idea that each task is only given out at the start of the month & you have a whole month to complete - that made it less daunting. 

The format was uniform across the year - 6x6 inch squares with a 4inch circle that the work is done on.  A stiffening board is inserted in between the front & back layer to give it strength then the edges have to be finished in a sturdy blanket stitch. 

To keep me on track, I cut 13 identical fronts, backs & the stiffeners & placed them in a small plastic container along with the roll of thread I would use to blanket stitch each months work. That was the deciding factor for me because I could take out what I needed without having to go through the process of finding the same fabrics, cutting the 3 needed for each task each month. 

I decided to machine embroider the monthly name on black fabric & fabric glue it to the back of each one to remind me what the challenge was. That will be a good reminder down the line. 

Here are the previous monthly challenges:

1 - Snow blanket 

2 - Conceal & reveal 

3 - Renewal 

4 - New Life a New Life alternative 

5 - Blossom Time 

6 - From Source to sea 

7 - Radial Symmetry 

8 - Seed Dispersal 

9 - Seasonal Secrets 

10 - Fascinating Fungi 

11 - Wispy Mists 

The final one will be revealed in December then we will learn how we are presenting all 12 challenges. 

The wispy mist brief was to overlay a fine fabric over a landscape like trees to suggest the autumn mists. Paula offered several suggestions & having weekend visitors, I did not start it immediately. 

However, while on a walk around Stafford Castle on Saturday, an idea came to mind for the task - a path of autumn leaves with trees & suggestions of the green foliage too. 


I decided to do my 4 inch circle with free hand machine embroidery & after roughly drawing it on water soluble film, I did the image in several tones of each colour needed. That part is a little laborious because of the thread changes & rethreading the machine so often. 

I did some swirling grey misty shapes over the trees & then took it to the basin & dipped the film in it. 

It dissolves almost instantly leaving a good shape. However, I did not like the swirling mist embroidery over the trees - it was too distracting so I got out a little scissors & cut the threads loose. It was the last threads to go on so that was manageable but fiddly. It looked better without it. 

I put it on the front square then added a bit of green voile where the bushes would be & tacked the edges of the circle to the square. I covered the whole 6 inch square with a fine voile I had, pinned it then machined the edges like the previous ones.  The linen I used for the  fronts frays & isn't secure enough for the blanket stitching so a line of machine stitching gives support to the edges. 

It was then  blanket stitched in the same thread as the others. 

I felt it had lost its definition with the wispy mist overlay so when I came back to it a day later, I decided to put tiny stitches around the edges of the tree shapes to give them definition & it definitely did. 

Some soft wool was couched around the circular edges to finish it off as swirling mists & it is ready for the machine name to go on the back. 

I am pleased that my interpretation worked - this stitching challenge has encouraged us to think out of the box - it is suggestive rather than prescriptive which is so creative. 

Just one more challenge, I look forward to it. 

Thank you for stopping by, taking the time to read, share or comment. It is much appreciated. 

Dee ๐Ÿชก๐Ÿงต๐Ÿ“๐ŸŒณ


Sunday, 13 October 2024

#10 Circular Stitching - Fascinating fungi


 Month 10 of 12 months circular stitching saw the brief look at fascinating fungi & the forest floor in late Autumn when fungi are abundant & varied.  The previous ones are all listed here ...

The brief was to make fungi in our 4 inch circle. The suggested stitches were the fly stitch combined with the pistol stitch. 

It was suggested to make 3 smaller lightly padded Suffolk puffs then turn them over for the stitching to be done on the round back, suggesting the gills of the mushrooms 

I remembered that I still had these 3 beaded & stitched moss shapes from a stitch along on another group  - making zen is always so inspirational.

The stitches had been challenging & varied - several stitch combinations in each shape & they were still on a hoop along with the various green threads I had used.  They are perfect to combine with this challenge because fungi & moss live side by side on the forest floor. 

I cut out the 3 shapes & decided to add them to the already cut shapes I had prepared for the year. 

I came across this forest scene stamp in my stash & thought - why not? 

It is my understanding that heat will set the ink from normal stamp pads on fabric so I stamped the forest then heated it to set (supposedly.) 

The 4 inch circle was drawn on this stamped background then the cut out moss shapes positioned along the circle. 

I made 2 brown Suffolk puffs, turning the brown fabric around so the reverse was used as it was a gentler colour for the fungi. 

I decided to use the gathered side & as suggested, whip stitched the edges to give it a slightly raised look & then whipped some of the folds to give the structure of the underside of the fungi. 

 The 3 shapes were stitched on to the circular shape, some beads in the same colour dotted around the remaining circular shape. 

We had made these tiny flower shapes in our Blossom stitching in August so I combined circles in green & brown fabric to make the flower shapes & thought just 3 was needed on the forest floor. 

I am not sure about this but I lightly felted in some wafts of felting wool to suggest leaves & canopy on  the stamped background. 

The 3 edges were machined, the stiffener added in & the last edge stitched. It was overstitched by hand with blanket stitch as required so that the final task after month 12 will be to join them - we do not know that detail yet but I am confident mine will be fine as I have followed the binding instructions. 

It is interesting doing something quite different each month, we are encouraged to be bold & original & this is what I have done. 

Edited note - I was pleased that I pushed the boat out & incorporated stamping in this effort but it felt unfinished so I thought - it is mine completely so I am going to try something else. 

I used Ikea fabric pens to lightly add in details on the stamped background to give it definition. Just very light mark making to make it feel more complete & it certainly helped. What do you think? 

Thank you for stopping by, taking time to read, like, share or comment, 

Dee ๐Ÿชก๐Ÿ“๐Ÿงต๐Ÿ‚

Thursday, 26 September 2024

#9 Circular Stitching - Seasonal Secrets

Month 9  of the 12 month circular stitch project & this one has been challenging, only because I had a lot of other projects on the go & didn't spend as much time on this one. 

The previous 8 challenges & links are in last months project if you want to pop over  & look ... 

The leaf shape with suggested shibori technique looked interesting but it is not one I have tried before & I think I will still have a go at it.  

Some on the group had tried leaf impressions by hammering the leaf on to the square for it to leave an imprint but I did not find this too successful, some leaves are probably better at leaving an imprint than others I think. It might be something I investigate. Has anyone got any suggestions for this? My garden is still very much in the pink / green / purple colour range & so I decided to stay within this palette of colours. 

Again, it is all on a 6x6 inch square with a 4 inch circle in the middle to keep all of the pages uniform for the final assembly in December. 

My imprints did not work but hammering some fuschia flowers from our bush gave a blotchy outline. However, the garden is blotchy & messy at this transitional stage so perhaps I will leave those imprints? 

I decided to felt a leaf shape with leaves from our garden as inspiration. I have not felted in a few weeks & it was interesting to get to a shape that I was happy with. The yellow / cream / red markings are not as clear as I would have liked but it worked in the end. 

I then jabbed it on to the background fabric because linen is a good background for felting. 

An interesting challenge that I should have taken more time over but I can overthink challenges so sometimes it is important to just work the project until you get a result that you can live with. What do you think? 

Again it was finished off like the others with a row of machine stitching on 3 sides, the stiffening piece added in before the last side was machined. The edges were then blanket stitched using the same large roll of thread to give uniformity to all the pieces at the end. 

I will still machine embroider the project name for the back (my choice) when I have a few to do as that is easier for me. 

It has been interesting once again & I’m pleased to be done within the month.  I know we do not always keep up with the projects we sign up to so this is a good discipline for me to complete each in the time allotted so they do not bunch up & overwhelm. 

Thank you for stopping by, your visits are always appreciated. 

Dee ๐Ÿงต๐Ÿ“๐Ÿชก๐ŸŒณ๐Ÿก

Wednesday, 4 September 2024

#8 Circular Stitching - Seed dispersal

 Looking back over my blog, you might think I spend my life sewing - it is just one of the many things I enjoy & it is easier to record & blog about. It also shows a record of ongoing projects & the progression which I like to look back on. 

I started this circular stitching project in January led my the lovely Paula  & wondered if I would be motivated to follow it for the whole year.  The projects are released each month which makes it manageable & less daunting. It is always new ideas & creative challenges, I like to do new things which challenge us out of our comfort zones. 

All 12 challenges are done on a 6x6 inch square with a 4 inch circular part, stiffened & backed then blanket stitched around the edges. We do not know the final assembly but trust in the process. 

I cut all the pieces - 13 fronts, backs, stiffening middle fabrics & have them in their own holder which means it is easier to follow the challenge as it is ready to work on. This small step has helped to keep me on track each month. 

The 8th challenge in the 12 month circular stitching challenge was about  seed dispersal. 

The 7 previous challenges are

1 - Snow blanket 

2 - Conceal & reveal 

3 - Renewal 

4 New Life & alternate nest 

5 - Blossom time 

6 - From Source to sea 

7 - Radial Symmetry 

The one for August was about seed dispersal of dandelions through the various stages of growth. It suggests making suffolk puffs which I know about but have never actually made, even though they are so easy to do. I underestimated how tiny they would pull to or I would have doubled the starting circle size for them. This is an interesting use for them 

I used a piece of printed fabric in greens & yellows for my circle, then did 3 Suffolk puffs in yellow & 2 in white fabric & then stitched them on to the circle. The white ones were the seed dispersal ones with threaded seed lines radiating out. I thought it needed beads to give it texture so those were added to give the lightness dandelion seeds need. 

The bottom half was overstitched to the backing square, the top half secured by the stitches of the seeds. 

Three sides were sewn together, the stiffening square cut to size (rounded tops for insert it easier) and then the sewing completed. I have machined stitched the edges of all mine before blanket stitching because the white linen I used tends to fray & the line of machine stitching makes it more secure. 


It is all done, just the backing name to machine embroider with the next one. I used clear beads on the white seeds to suggest a lightness to them & let them spill over on to the outer fabric which I like with the white on white stitching. 

It is an interesting project because each has been different & I know what September's is already & that is a new one too. 

Do stop by soon to see the next one. Do you have  a project you are working on? Tell all please & thank you for stopping by, 

Dee ๐Ÿงต๐Ÿชก๐ŸŒผ๐ŸŒฑ

Sunday, 7 July 2024

#7a Circular stitching all up to date so far ...

This circular stitching challenge for the year is incremental - one challenge per month, with no advance suggestions which makes it interesting. It  has a set requirement of 6x6 inch squares with a 4 inch diameter circle in each - that is all we know before each months challenge is released on the first of the month by Paula

That makes it very doable because you have the whole month to finish that months challenge. 

When I started in January, I cut 13 squares for the fronts, the same for the backing & bought a large roll of embroidery / thin crochet cotton to do all the edges to keep it uniform. Each months has to have a stiffener in between the layers (pelmet stiffener - a new one for me) and I cut all of them as well & the 3 layers are stored in a tub just for this challenge. 

I know I am more likely to finish the project if it is all prepared & I just have to do the circle, and that depends on the challenge set. 

The sides have to be bound with a blanket stitch, we do not know how the finished set will be bound together which makes it interesting. 

My front squares was cut from some lovely linen, however, the edges are prone to fraying so I have machine stitched 3sides of each together, cut & inserted the stiffener, then machined the 4th side before over stitching all the edges with blanket stitch. The row of machine stitching gives a firm row to do the blanket stitch from which has solved the linen fray problem. 

After stitching the 7th challenge, I machined, then handstitched before deciding to do the lettering for the last 4 challenges on the back (my choice) so I know what each challenge was. 

Fortunately my second machine has lettering (that was a deciding factor when I bought it off a friend who was upgrading). However, I still have to look up the process each time when changing the machine feet for it.  

I saved a length of black fabric to do the lettering for all of them. For some reason, the under thread bundled up a few times & it had to be cut loose which then messed with the lettering order but once I changed bobbins, it seemed to resolve itself. 

Machines, particularly electronic ones, can be more temperamental than the bog standard ones (like my old one I now have set up for free motion embroidery. 

The name labels were glued on to the reverse of each with fabric glue & it is all up to date now. 

These challenges have been interesting, with new techniques but that makes it exciting.  It also depends on your creative skills to adapt to the challenge in a unique way. 

1 - Snow blanket 

2 - Conceal  & reveal 

3 - Renewal 

4 - New Life  alternate nest 

5 - Blossom Time 

6 - From Source to Sea 

7 - Radial Symmetry 


Are you tempted by such things but don't complete because you run out of steam or interest? Tell all ... 

Dee ๐Ÿงต๐Ÿชก๐Ÿ“

Thursday, 4 July 2024

#7 Circular stitching - radial symmetry

The 7th challenge in this year long stitching project made for interesting reading. Plants have radial symmetry & the challenge was to show this in stitching. 

Number 6 with the previous ones is here  

All of them have been interesting,  mostly out of my comfort zone but that is how we learn & grow. 

The suggestion was to use a crochet doily as the base circle but none of mine were even vaguely close to the circular size of 4 inches in diameter on a 6x6 inch square.  I have not really had to draw such a complex shape & so it needed thought - that is one of my strengths - improvising. 

Some early starters on the facebook group drew mandala's & embroidered those. Again, not an easy shape to draw on to fabric & I have not done mandalas before.

I found a mandala shape online, copied it to a Word document in 2 sizes, hoping one would be close to the right diameter & printed them off. 

How to trace it to the fabric?  I spied a pack of A4 freezer paper I had bought to experiment with but had not used so I scanned the sheet with the mandala's & printed it to the freezer paper sheet. It worked - phew. 

The instructions say iron the glue side to your fabric so that is what I did  & it stuck. A massive sigh of relief.

I have my embroidery threads sorted in containers by colours so I selected the pinks / purples / lilacs / greens & took them to the conservatory where the light is so good. 

It seemed right to select 3 colours for the flower shape & each colour was stitched, then the second & third. I used greens in the centre & around the inner circle shape, then a different green in  running stitch to give a lightness to the outer edge.  

The little circles were going to be French knots but they were lost in the shape so out they came & satin stitch worked just fine. 

It was finished in just a few hours - a relief as it was a shape I did not know how to approach first of all. 

I am especially pleased that the back is almost as neat as the front & that is a big deal for me as I am not a neat embroiderer. My Mother's used to be almost the same on both sides & I was always in  awe of her skills. Mine is improving & that is good. 

I still have to stitch it to the back panel, insert the stiffener & then finish up the fourth side. I need to machine embroider the names of the last few months for the back of those - white thread on black to match the others. 

Do you take on random challenges that are out of your comfort zone? I was not sure I would manage to do this year long one each month but having a month to do each one has made it manageable & more importantly, it has challenged me & that is always a good thing. 

Thank you for stopping by, your company is always much appreciated.

Dee 

Sunday, 19 May 2024

#5 Blossom time in the circular stitching challenge ...


 This is the 5th of the monthly challenges titled Late Spring, Blossom Time. 

The project uses a uniform format of 6x6 inch squares with 4 inch circle. They all have to be strengthened & bound with a sturdy blanket stitch. The organiser has not yet disclosed how the final project will be put together but I'm sure it will be fabulous. 

The technique is set out in the first blog on it - 

Snow Blanket 

Conceal & Reveal 

Renewal 

New Life & an alternative one 

The fifth being Blossom Time in late-Spring.

The brief was to make a tree & then add lots of pink blossoms to it, keeping within the circle. 

I made several attempts at the tree before I was happy with the shape & colour. In my mind, the tree was meant to be the easy part but it needed some thinking through. 

When looking through my fabrics for some pinks, I found this one with blossom like patterns in various shades of pink & knew it would be perfect. I duly cut out some, pleased to have the variation in colour. 

I find the variegated balls of Coats threads to be extremely useful - I often pick up an interesting ball in a charity shop to add to my collection. 

The tree was made from a selection of wool & various shades of brown threads, loosely wound together & placed on the circle. The suggested braiding did not look right but the loser shape was better. 

It was couched in place in a few places with the threads thinned out as the reached the edge of the circle, as a trees branches would. 

The cut out pink blossoms were more fiddly & I did a few open & the folded the other in various ways, before securing with stitching on to the tree shape.  The branches needed a bit more definition so I used 6 strands of two browns, separating the stands before using them as that gives a more uniform colour.  It was just what was needed as the branches had receded with the blossoms on them. 

The base needed something & I used more Coats threads in a vibrant Spring green. 

I think it worked out well according to the brief.  The backing was again machine stitched to the front on 3 sides with stitch 47 on my machine (I keep forgetting which edging stitch I used hence naming the number) . I trimmed & inserted the stiffening square as done on the previous ones, then stitched the last side closed. 

I decided at the beginning to keep a uniform look across the project so cut enough, front, backing & stiffening fabrics for all 12 the challenges. I also bought a large ball of sturdy off white thread to be used to blanket stitch all. I duly did the stitching on this 5th one & it can now join the others in the container. 

The new challenge is revealed on the first of each month so I am pleased to have this one completed. I still have to do the machine embroidery names for the back but will do that with the next one as the names are just glued on the back with fabric glue. 

I am rather pleased with this one, something completely different to what I usually do but that is how we grow as stitchers .... 

Thank you for stopping by, do you have a project to share with me? 

Dee ๐Ÿงต๐Ÿชก๐Ÿ“

Sunday, 14 April 2024

#4 Free motion embroidery circular nest alternative


I love having free time & this morning, a lazy Sunday, I had written up my previous circular stitching woollen nest for April, I had a niggly thought of a different way to do it in my head. Why not try out the alternative even though the first one is done & edged? 

This is a circular stitching project & other than some couching of the 'nest wools' & the edges, there was little stitching. I had a thought in my head from when I did a 3D free motion embroidery course that would work rather well as a nest. I have used solvy film in another project too & understand that the threads have to overlap because that is all that hold it together once the water soluble film is washed away - an interesting challenge. 

I have 2 sewing machines set up in the spare room - my trusty 20 year old basic Toyota does not have drop feed dogs which is not ideal but the feed dogs are covered by a plastic plate for free motion (so the work can glide / be guided by hand only). I had to modify (sand) a wooden hoop so it would fit more easily under the free motion foot once attached & it works well (with red marker to show where to slide it in & out) 

I have experimented with various free motion feet & have a selection - some working easier than others. Last year a friend was selling her electronic Brother machine, the very model I had been looking it, so I bought it from her (she was upgrading to one that could do patterns for commercial work) & it is a dream for stitch choice & it does basic lettering too. 

However, the new machine, while the feed dogs drop easily, has a smaller working space & it is lower so there is less room to maneuverer an embroidery hoop by hand. However, having 2 machines, means that one can be set up with the right free motion feet & plate so that makes it quicker to try things. 

You can see the difference in the working space between the machines. 

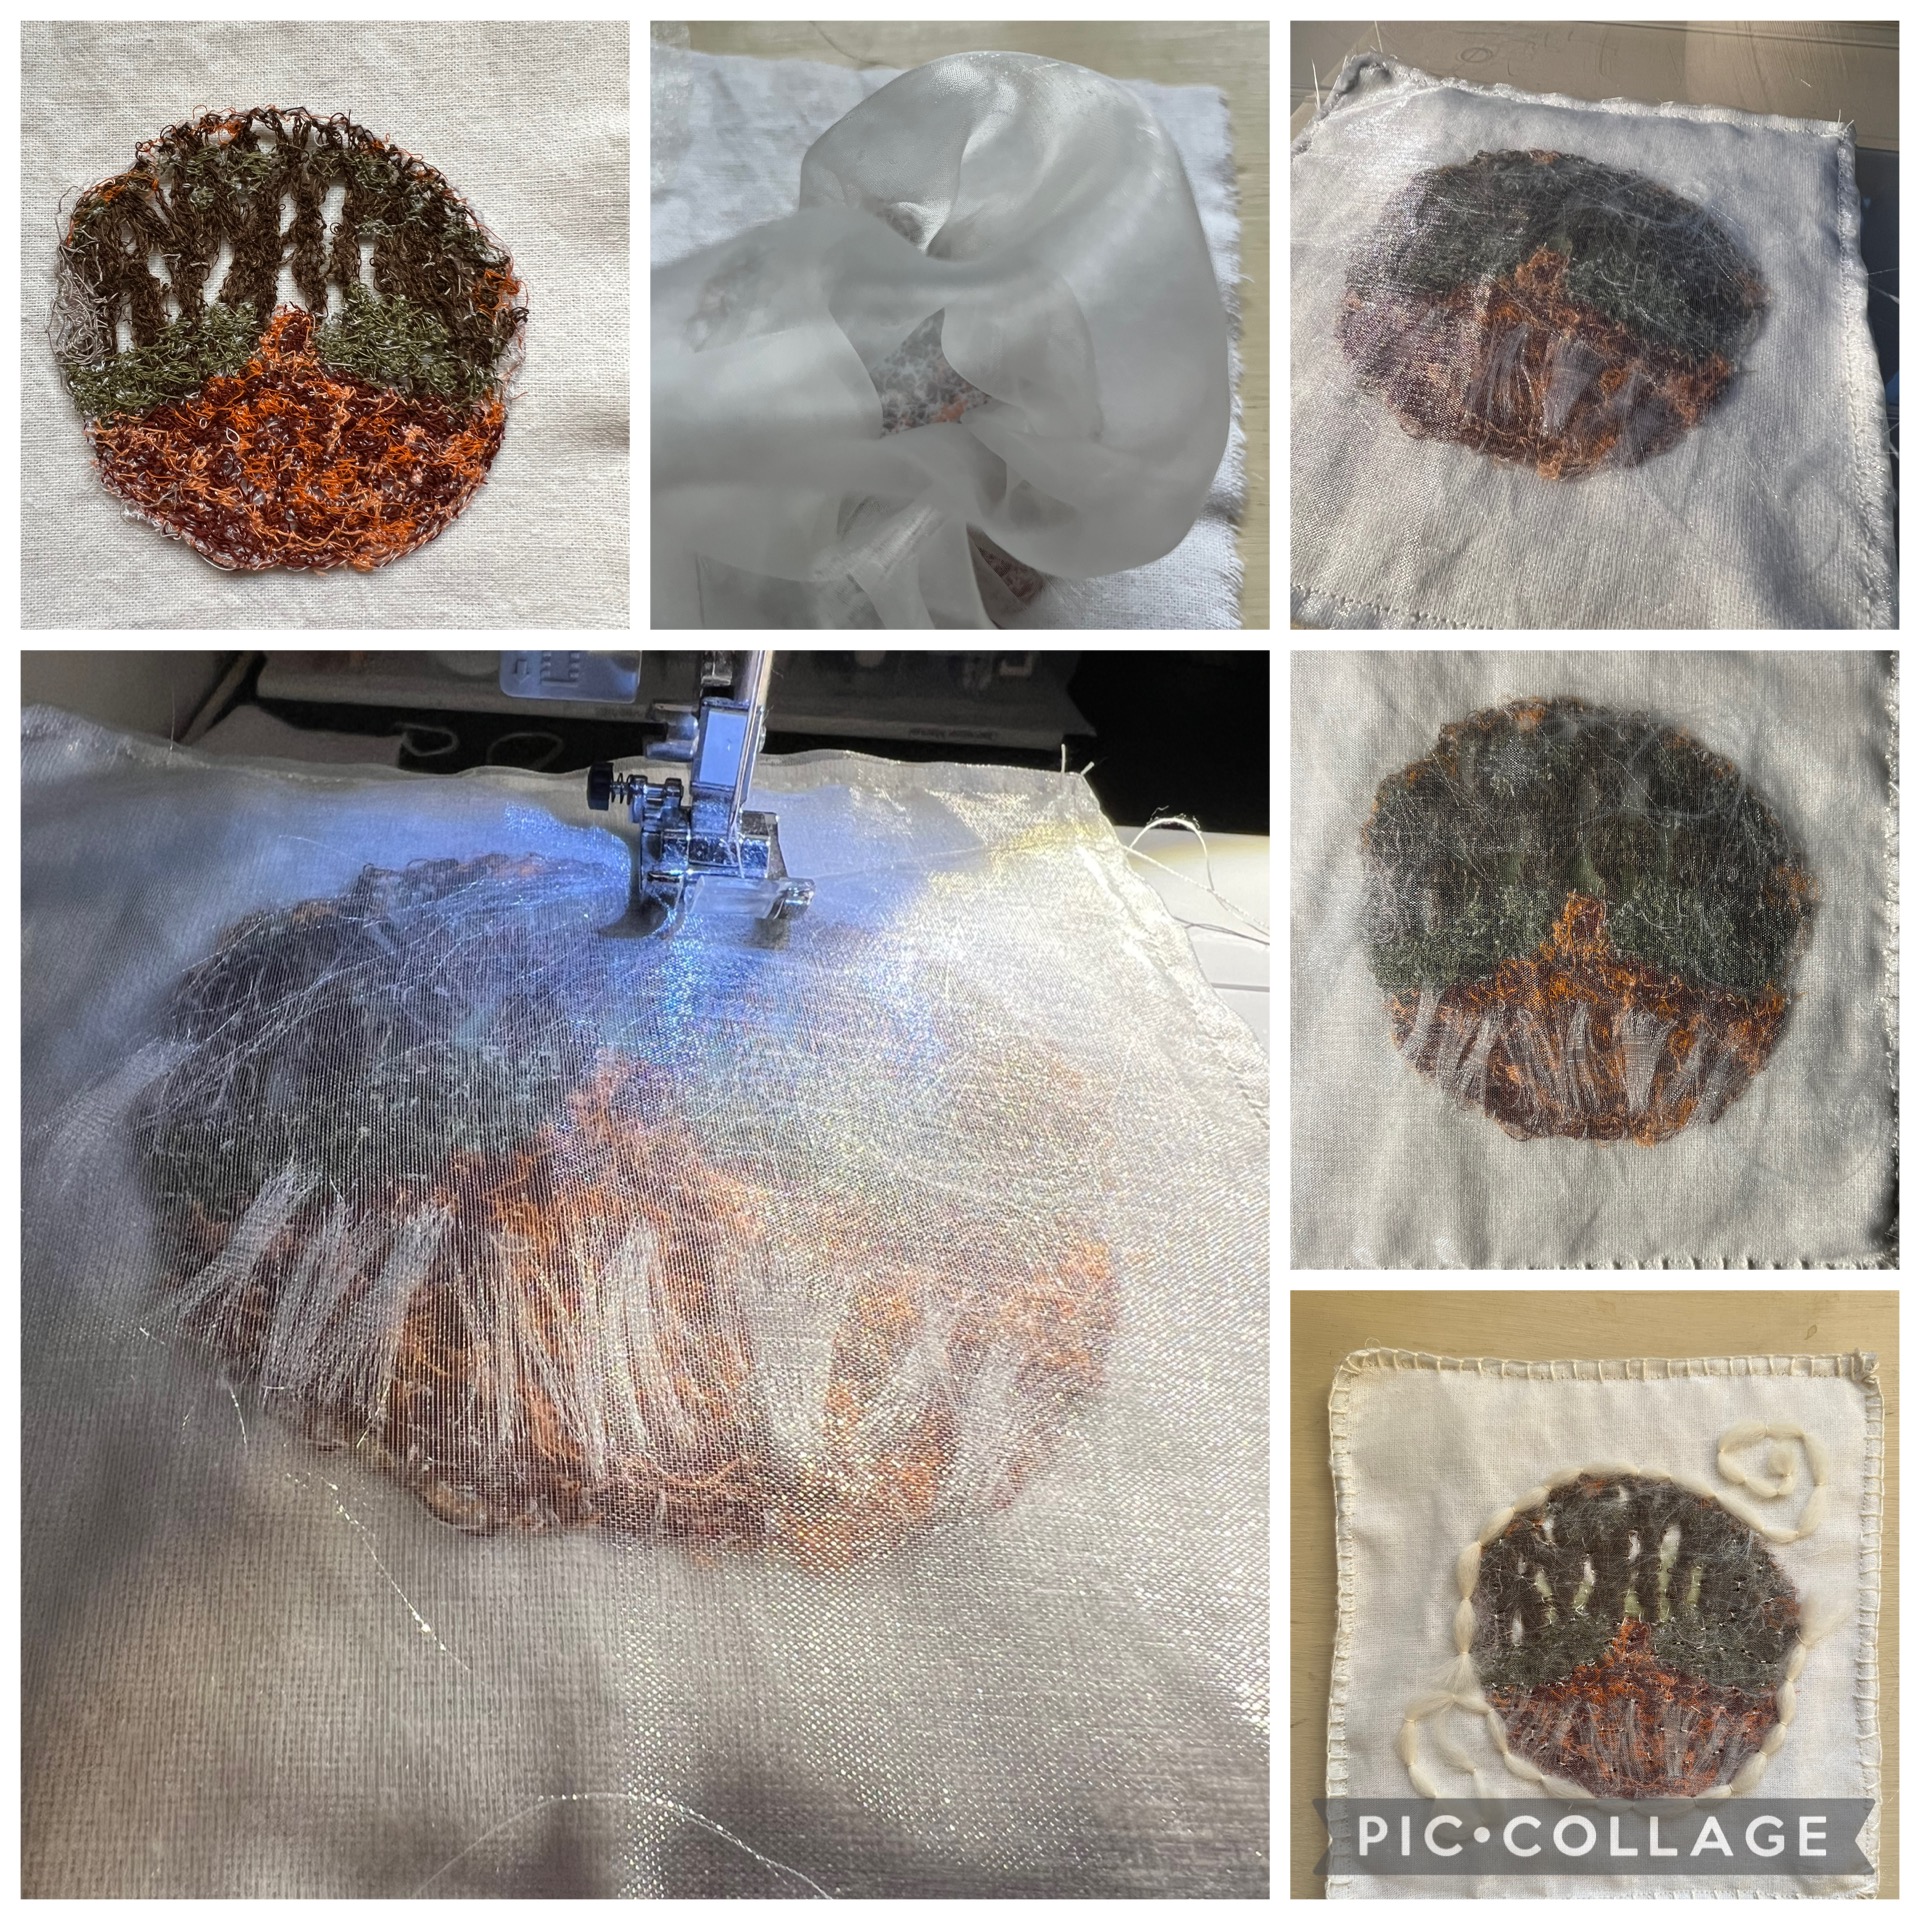
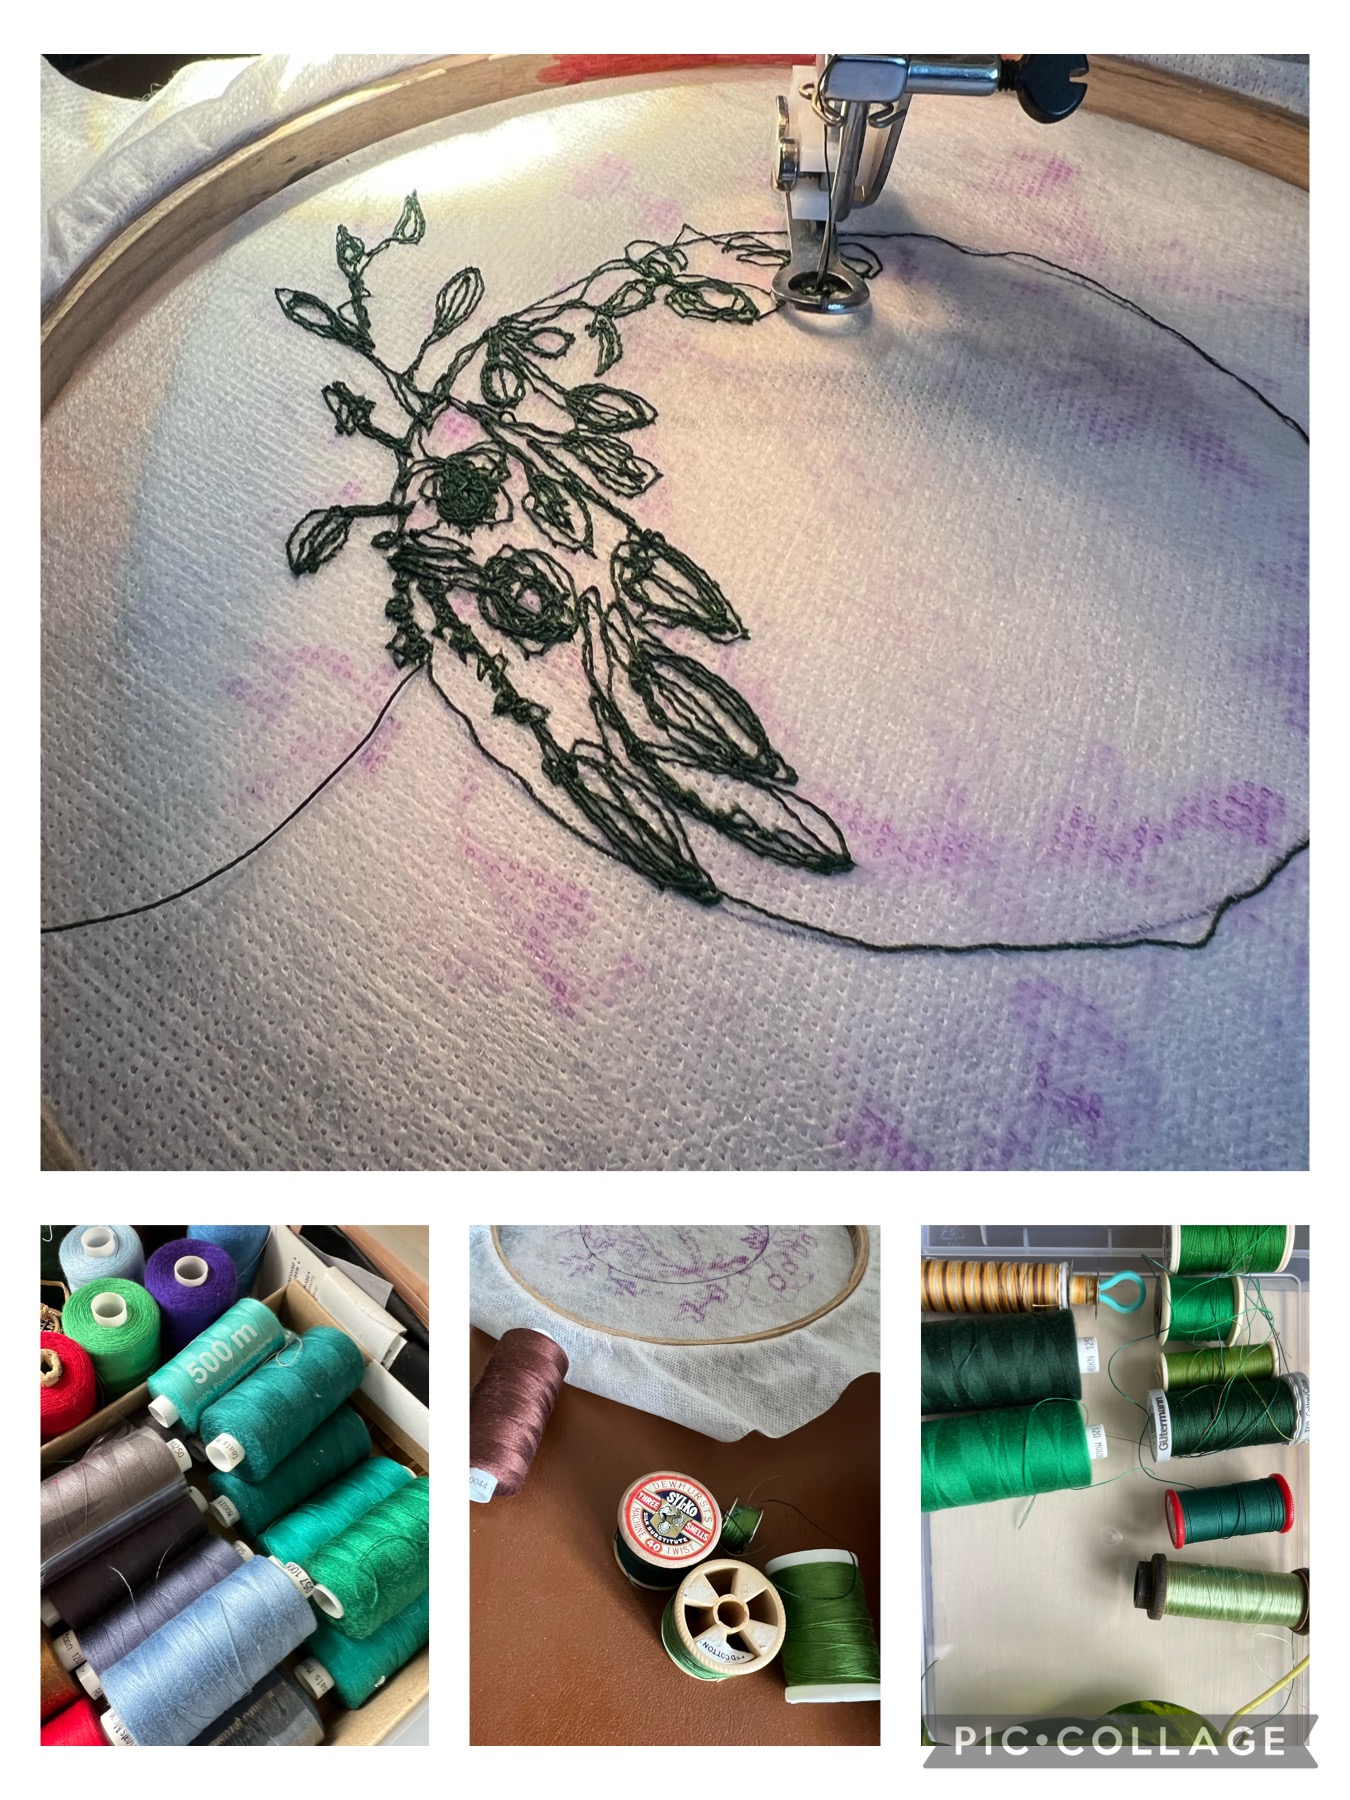
This morning, acting on my inspiration, I added some Solvy film to my hoop, traced the 4 inch circle on to it & drew in some details of ivy like vine leaves. I drew some leaves outside the circle, as well as at the bottom & the top with the idea of bending them over to hide the nest part of the sewing with an additional layer.  I should have used the frixion pen as this sewing one didn’t give neat lines but it was ok in the end. 

From the course i did, I remembered to select various shades of greens to give the work depth, threaded up the machine, then lost several hours to the immersive time of free motion embroidery. (Changing bobbins is easier on this one for free motion as the work can be kept in place while you do it) 

Bundling up some green silk threads from my late mother in laws stash that were too fragile to be sewn with, but were perfect for a nest. I pulled some off, put it between two layers of Solvy film then just ran a few machine threads over it to keep its shape. 

The stitches have to loop over each other, circular motion works well because it holds the threads together when the work is dipped in warm water & the water soluble film disappears completely. The threads give it structure but they can be manipulated in creative ways which is what I enjoy.

It is so easy to get lost in this process & once I got on to the second green thread, I could see my outline sketch was taking shape & it felt more ordered.  Several other thread changes & I decided it was done. 

Changing the cotton to blues, I decided to do the egg shapes suggested in the brief in machine embroidery. Because the section was so small, I doubled over the film & just held the edges between my hands to give it rigidity. It worked but it did snag a few times. 

The moment of truth - taking it all downstairs to the basin & draining board - will it hold its shape? Have I joined the sections enough & was my design appropriate for the sewing? 

The silk threads held in the simple outline, the blue threaded eggs kept their shape - the largest one to be dipped last ... 

Phew, the film dissolved immediately leaving a very good outline of a hedgerow of leaves & a good circular shape. 

I lifted it out, it still felt sticky with the film, so I changed water & dipped it again, then placed it gently on a clean tea towel to dry. 

I pinned the nest shape to a piece of polystyrene (as we had done on our course) to hold its shape. This also made it easier to fold over the tendrils that I had made outside of the circle. I am rather pleased with how well they flipped over & on to the circular shape. I pinned them in place to dry. 


I love doing courses in new techniques because they give you confidence to return to them. This free motion shape has challenged me in the design but I am rather pleased I went with something quite different.  

Hmmm side leaves curled in or left out? What do you think? 

What to do now seen as I have already hemmed & edged the felt nest? Perhaps I will add it to the reverse of that panel  as the alternative or  perhaps I should add it to my 100 day sewing roll that is not making as much progress as it should ... 

What do you suggest? Give me some ideas please. Thank you for your company, inspire me with your projects. 

Dee ๐Ÿชก๐Ÿงต๐Ÿชก