Tuesday, 30 July 2024

The unexpected red theory in the garden ...

 School's out for summer & I am enjoying catching up with friends, family & things I enjoy doing. I have had time to neaten up the garden & add some additional colour.  The sweet peas with the lovely colour & scent have been particularly good because of all our rain this summer. These were grown from seed & the white ones are everlasting. 

There is a well known decorating theory about the unexpected pop of RED in a room where it doesn't match, it improves the scheme. 

I read about this in January in the Garden & Home & was interested because it is not a colour I use too often in my home (though I did have a red wall at one time). 

It explained it as this: 

As creator Taylor Simon of @intayriors, a Brooklyn-based interior designer known for her eclectic style, explains, the unexpected red theory is basically adding anything that's red, big or small, to a room where it seemingly doesn't match. It's like a color pop but less contrived. 

According to Taylor, once that red piece has been added to your room, it automatically looks better. It can be as simple as a red lamp or soft furnishing, scarlet a painted window trim or doorframe, or a completely random brick red cupboard that stands boldly in your otherwise neutral kitchen. I don't know about you, but I'm pretty sold.

It does not matter about the shape or the size of the red element, it is the unexpected element that brings surprise, fun, drama to a neutral scheme. 

While out picking up some plants today at a local nursery, I was struck by the crocosmia Lucifer with its tall arched stems & vivid red flowers. They are like a punctuation mark - you cannot ignore them. 

Alongside them in the display was some more delicate Mrs. Bradshaw Geum - a deep red poppy type flower whose shape contrasted well with the Lucifer. 

I only have some bright red salvia's  (hot lips) in the garden & they certainly are a pop of colour. I potted up the two new reds together at the bottom of the garden. The pot is against the cream shed & next to white Japanese anemone's & a purple clematis. 

When viewed from the house, the reds are very dramatic so I am pleased I went with such a bold pop of colour amidst the mainly pinks / purples  / greens / creams of the garden. 

Have you experimented with an unexpected red? Tell all ... 

Thank you for stopping by, subscribing please, & sharing this, 

Dee ๐Ÿชด๐Ÿก๐Ÿ‘ฉ‍๐ŸŒพ

Monday, 15 July 2024

Danish blues in summer ...


 I recently refreshed the sideboard backboards because they were patchy & the paint flakes off on the joins.  It looks much fresher again & ready for another lot of use over the summer.  

I have a sizeable collection of Ridgway's Blue Danish blue china that was gifted years ago by Olive, my late mother in law. She did not use it at all, it was stored in her attic & the box was gifted to me (along with a 12 place setting of cutlery) 

Olive used to buy modern pieces that matched the pattern because she knew I used it.  

The original Ridgway's Blue Danish is a cobalt blue pattern 

I previously gave a comprehensive history of this pattern that is used by several well known china manufacturers 

The history of the pattern is as follows:

One of the most famous patterns is ‘ Denmark’ or ‘Blue Denmark’ produced by the business known as Furnivals Ltd and its successors. The pattern has a fascinating history.
The Furnivals ‘Blue Denmark’ pattern is based on an original produced in Copenhagen, Denmark, in the 19thCentury. Its origins, however are even older and tradition has it that the pattern was brought to Europe from China or Japan at some time in the late 18th Century.
Frantz Heinrich Muller first produced the pattern at his pottery in Copenhagen at some time between 1776 and 1779. After establishing his pottery he travelled to Germany and recruited skilled workers from the Meissen factories. It is likely he also discovered and brought back what was to become known as the ‘Danish’ pattern.
Other names have been ‘Denmark’, ‘Blue Denmark’, ‘Danish Pattern’ and ‘Mussel Pattern’. Muller was a chemist and his contribution may have been the development of the characteristic ultramarine blue used on the wares. The pattern was immediately popular and when Muller’s factory was rescued by the financial support of King Christian VII and became the Royal Porcelain Factory of Copenhagen ‘Royal Copenhagen’, the ‘Danish’ pattern was central to its success – as it still is today.
On close examination the pattern consists of a repeating pattern of mussels and stylized flowers traditionally in an under-glaze blue on a white background. The pattern is complex, but not over-elaborate and sits crisply on any pure white background.
To quote from the Pottery Gazette – “The effect pleases everyone with any sense at all of neatness and clarity. It seems somehow to typify the typical Danish love of hygiene in food preparation and service, this quality being self-expressed in terms of coolness. There is a clean, satisfying, superlative beauty in it that seems to conjure up a sense of health and vitality.”

Furnivals were the most prominent of several Staffordshire potters to produce versions of the pattern based on the Royal Copenhagen original. Company records suggest that the pattern was produced from the 1850s and with virtually no modification to the pattern or shape was produced until the closure of the business in 1968.


The Dutch cheese plate is used for more than just cheese; the delft colours & patterns go well with the blues & it often holds cakes, bread, cheese, pastries etc

I might do a supper setting with blues over the summer for friends too while it is all out ... 

The blues do appear in Spring  & at Easter even along with other colours. 


I find this pattern & blues hard to style on the sideboard - what to put with it? It is stored in a large cupboard in the kitchen & we use the cereal bowls every day as they are a handy size. However, the older pieces  need to be handwashed so are only used occasionally.  

We don't have many flowers in the garden this year but some sweet peas, pink roses & purple bits lift the colour in the little flower brick. I love flower bricks because they hold the smaller blooms so well. 

I think pink & white blooms lift the intense blues of the Blue Danish pattern - perhaps it needs more pink china? What do you think? 

Any ideas will be gratefully received, thank you for stopping by, 

Dee ๐Ÿฝ️๐Ÿ’๐Ÿ’™

Saturday, 13 July 2024

#7 - Crossing paths with the Picts in Scotland

 I find genealogy fascinating & have done extensive work on my complex family tree.  With information online, several sites connect to known lines & mine (through my Mother) connects all the way back to the early inhabitants of Scotland, the Picts. They are known by the huge intricate stones they left behind 

While touring around the northern regions, I noted several Pict sites to visit. 

The Shandwick stone was a really impressive sight ... 


The Shandwick stone or Clach a' Charridh is one of the many found on the Pictish Trail along the North Coast of Scotland. 

From the harbour, the stone if on the hill opposite, in a prominent position. 


It stands in its original site, high on a hill overlooking the Moray Firth.  It is an impressive 9 feet tall, intricately carved on all sides. It is described as ... 

One side of the stone (on landward side) has panels including a busy scene of birds, beasts and human figures and a fantastic pattern of spirals. The other side shows a cross decorated with spiral work and surrounded by angels, animals (perhaps references to biblical stories), and complicated patterns of snakes and interlace.

The jewelled Cross has 54 raised spiral shapes (bosses) 

A good drawing of the stone is here ...  

It is protected from the wild elements by a glass case.

There is something quite primaeval about connecting to history so long ago, it is as if time stands still. Looking out to the sea from the top of the hill was strangely moving. 


At Armadale Castle on Skye, they had a fascinating visitors centre / museum which included history of the Picts in the region. 

It is known that 3 Pictish symbol stones have been found on Skye 


I will include some more Pict sites when I visit Scotland again. I know the link is tenuous but it is fascinating never the less. There are over 300 Pict stones across Scotland, many with dragon like beasts, interesting that they had a 'written' history & then they mysteriously disappeared. 

There are some interesting Pict facts on this page - I'm not sold on the tattoos & painting themselves blue which must have been a truly frightening sight, given that they were numerous barbaric tribes.

We know this about the Picts on the isle of Skye

The first millennium AD was a time of upheaval with different groups such as Picts, Gaels and Scots and eventually the Vikings appearing on the scene. Around this time clans developed, people lived in small communities, (Clachans), grew oats and barley and traded up and down the coast. 

Thank you for stopping by, I hope you have enjoyed this little bit of history ... 

Dee 

Wednesday, 10 July 2024

Refreshing the sideboard paint


You all know how well used our conservatory sideboard is - we use that space the most in the house, the large table can seat 12 & the sideboard is used for serving from & for having the things we need most at various times like

Coronations, Jubilee , Royal Weddings

Easter , Easter favourites

Christmas, Deer

New Year , Baubles, 

Summer, autumn, Spring

Africa, Woodland,  Family crockery, Rugby, Cheese & Wine, Blues

I change it several times a year because things are used when they are at hand. 

On Sunday, while pottering with my many plants there, I felt a drip on my head, then another & another. WHAT? Hubby came to investigate & one of the roof panels had slipped slightly in its mounting & was letting in water. 

I completely cleared the sideboard so we could move the panel directly above it. 

Handy grips (from a local hardware shop) helped to secure it back over but it needs to have seals & silicone in place but  our weather has been too wet to do it. 

While it is cleared, I decided to repaint the back of the shelves. I did them a few years ago but the paint was patchy & it irked me. I did some Annie Sloan Chalk Paint courses locally years ago & am confident to repaint furniture, chairs etc 

I had bought this brand of chalk paint some time back, different to the usual one I use & thought - seize the moment. 

It was wiped down & then the paint was well stirred, slightly watered down (about 30ml of water) and then applied. 

It actually went on rather well. Instead of masking the shelves, I cut a sturdy bit of cardboard from packaging & held that against the shelves - it worked very well to keep the line straight. 

A coffee & some rusks on a tray I had bought in Toledo on my Spanish adventure last year kept me on track. 

A second coat a day later & it will be ready for a change of things. What to put on? What will we use over the summer when we eat there all the time? What do you suggest? 

Thanks for stopping by, it is always appreciated.

Dee ๐Ÿ–Œ️๐Ÿ‘ฉ‍๐ŸŽจ๐ŸŽจ

Sunday, 7 July 2024

#7a Circular stitching all up to date so far ...

This circular stitching challenge for the year is incremental - one challenge per month, with no advance suggestions which makes it interesting. It  has a set requirement of 6x6 inch squares with a 4 inch diameter circle in each - that is all we know before each months challenge is released on the first of the month by Paula

That makes it very doable because you have the whole month to finish that months challenge. 

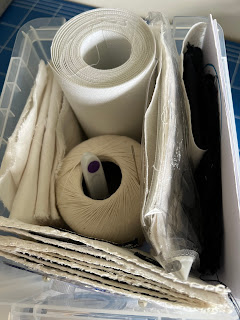
When I started in January, I cut 13 squares for the fronts, the same for the backing & bought a large roll of embroidery / thin crochet cotton to do all the edges to keep it uniform. Each months has to have a stiffener in between the layers (pelmet stiffener - a new one for me) and I cut all of them as well & the 3 layers are stored in a tub just for this challenge. 

I know I am more likely to finish the project if it is all prepared & I just have to do the circle, and that depends on the challenge set. 

The sides have to be bound with a blanket stitch, we do not know how the finished set will be bound together which makes it interesting. 

My front squares was cut from some lovely linen, however, the edges are prone to fraying so I have machine stitched 3sides of each together, cut & inserted the stiffener, then machined the 4th side before over stitching all the edges with blanket stitch. The row of machine stitching gives a firm row to do the blanket stitch from which has solved the linen fray problem. 

After stitching the 7th challenge, I machined, then handstitched before deciding to do the lettering for the last 4 challenges on the back (my choice) so I know what each challenge was. 

Fortunately my second machine has lettering (that was a deciding factor when I bought it off a friend who was upgrading). However, I still have to look up the process each time when changing the machine feet for it.  

I saved a length of black fabric to do the lettering for all of them. For some reason, the under thread bundled up a few times & it had to be cut loose which then messed with the lettering order but once I changed bobbins, it seemed to resolve itself. 

Machines, particularly electronic ones, can be more temperamental than the bog standard ones (like my old one I now have set up for free motion embroidery. 

The name labels were glued on to the reverse of each with fabric glue & it is all up to date now. 

These challenges have been interesting, with new techniques but that makes it exciting.  It also depends on your creative skills to adapt to the challenge in a unique way. 

1 - Snow blanket 

2 - Conceal  & reveal 

3 - Renewal 

4 - New Life  alternate nest 

5 - Blossom Time 

6 - From Source to Sea 

7 - Radial Symmetry 


Are you tempted by such things but don't complete because you run out of steam or interest? Tell all ... 

Dee ๐Ÿงต๐Ÿชก๐Ÿ“

Thursday, 4 July 2024

#7 Circular stitching - radial symmetry

The 7th challenge in this year long stitching project made for interesting reading. Plants have radial symmetry & the challenge was to show this in stitching. 

Number 6 with the previous ones is here  

All of them have been interesting,  mostly out of my comfort zone but that is how we learn & grow. 

The suggestion was to use a crochet doily as the base circle but none of mine were even vaguely close to the circular size of 4 inches in diameter on a 6x6 inch square.  I have not really had to draw such a complex shape & so it needed thought - that is one of my strengths - improvising. 

Some early starters on the facebook group drew mandala's & embroidered those. Again, not an easy shape to draw on to fabric & I have not done mandalas before.

I found a mandala shape online, copied it to a Word document in 2 sizes, hoping one would be close to the right diameter & printed them off. 

How to trace it to the fabric?  I spied a pack of A4 freezer paper I had bought to experiment with but had not used so I scanned the sheet with the mandala's & printed it to the freezer paper sheet. It worked - phew. 

The instructions say iron the glue side to your fabric so that is what I did  & it stuck. A massive sigh of relief.

I have my embroidery threads sorted in containers by colours so I selected the pinks / purples / lilacs / greens & took them to the conservatory where the light is so good. 

It seemed right to select 3 colours for the flower shape & each colour was stitched, then the second & third. I used greens in the centre & around the inner circle shape, then a different green in  running stitch to give a lightness to the outer edge.  

The little circles were going to be French knots but they were lost in the shape so out they came & satin stitch worked just fine. 

It was finished in just a few hours - a relief as it was a shape I did not know how to approach first of all. 

I am especially pleased that the back is almost as neat as the front & that is a big deal for me as I am not a neat embroiderer. My Mother's used to be almost the same on both sides & I was always in  awe of her skills. Mine is improving & that is good. 

I still have to stitch it to the back panel, insert the stiffener & then finish up the fourth side. I need to machine embroider the names of the last few months for the back of those - white thread on black to match the others. 

Do you take on random challenges that are out of your comfort zone? I was not sure I would manage to do this year long one each month but having a month to do each one has made it manageable & more importantly, it has challenged me & that is always a good thing. 

Thank you for stopping by, your company is always much appreciated.

Dee 

Wednesday, 3 July 2024

An unexpected redesign to the garden hedges ...


 I love space, green space in particular as it has such a calming effect on ones wellbeing. During lockdown, I often shared how our garden helped us to keep calm when the world around us was in such turmoil. 

I potter, grow salad greens, tomatoes & herbs & am always watering (from the waterbutts) adding to the beds or sharing cuttings with friends. 


I have always gardened or grown things in pots - indoors or out, in various countries; it is part of my being. 

Two weeks ago,  as I was preparing for students, my morning peace was shattered by the sounds of a chainsaw. 

I was taken by surprise because hedges & trees cannot be cut during nesting season (from March until the end of August) . I was not even aware that the neighbour had thoughts to cut down this mature hedge as this is only their second year in that house. 

We always watch the squabs (young pigeons) fledge from this hedge in nesting season & have had several taken by a sparrowhawk that seems to know the nesting season well. 


We have hedges / bushes / shrubs on 3 sides, 2 of which belong to us as they fall within our boundaries, the third in a neighbours but we have always maintained our side & the top for at least 15 years. 

My interventions were fruitless & the hedge was unceremoniously cut down on a whim without even checking for nests. 

It is upsetting having this 20 foot long hedge cut down & the loss of the 8-10 foot height has left us feeling rather exposed to the other neighbours that I know well. 

Hedges are also wonderful sound barriers; muffling the sounds from the gardens & providing welcome shade & a green oasis in summer.  Removing all the greenery creates a heat island which can easily be several digits higher in temperatures than the surroundings. In winter, hedges break the winds that whistle up the road so they are essential in bad weather.

Hedges & plants also filter out pollutants which is beneficial to health. This NASA site explains it rather well ... 

The most noticeable effect was observed on a holiday in Sofia in Bulgaria, when the street  temperatures were well in to the 40C & the radiating heat from the pavements & bitumen roads made it so uncomfortable. While out walking to the Cathedral, we turned in to a side street to return to the market & were met by shade & cooler temperatures because the street was lined on both sides by beautiful trees. It really brought home the effect of trees on the ambient street temperature. 

I digress - faced with a bare patch above our fence, I ordered 140-160cm laurel bushes from an online company because our local plant nurseries did not have large enough ones. 

I asked a  parent of one of my students to do the groundwork. He has his own gardening business & has the right equipment to make fencing holes so it was a lot easier for him to do it. 

Our large corner tree sheds all its leaves in Autumn & we rake them in to the corner under our back hedge where they break down in to nutritious dark leaf mould. I put lots of this well rotted leaf mould in the new potting holes, along with bonemeal as suggested for laurel hedging. 

The 4 large plants arrived after about 10 days & they are very healthy but closer to the 140cm height rather than 160cm I had hoped for.  


However, they were planted along with a witch hazel I moved from another flower bed. I moved many of the geranium pots from the shed / summer house & added even more leaf mould around the pots & the new plants to preserve water & protect the plants as they settle in. 

They look promising & I have been staking them & using plant clips to straighten out the branches for added height, willing them to grow to the top of the fence at least this summer. 


The upside is that this laurel hedge is now completely in our garden so it will provide the side hedging to our rear garden.  Unfortunately this will not reach full size for a few years which is a shame for the nesting birds but it is a start. 

To distract myself, I have brightened up our hanging baskets in the front & been thankful for sunlight & rain, hoping the laurels will grow about 50cm this year … 


Is privacy important in your environment? Tell all ... I hope you will look in again, follow & share please. 

Dee ๐ŸŒณ๐Ÿก๐Ÿชด๐Ÿ‘ฉ‍๐ŸŒพ