Friday 28 March 2014

A monogrammed leather book

Do you get as excited as I do when I am faced with a beautiful book? As much as I love  the convenience of reading on a Kindle or such likes, there is something really enduring about holding a beautiful old book in your hands & appreciating it for the history it represents.

While browsing in the pretty Shropshire town of Ludlow, we found a real gem in an antique shop.

My friend saw a monogrammed leather book on a shelf with her initials on it [E H] and we both knew that it was going home with her.


On opening the cover, there was a note in the front about Copperplate poems that had been copied.

As a teacher, I have taught hundreds of students to write so can appreciate the tremendous effort required for handwriting of such beauty.

The slant & pressure is so beautiful - I could visualise a young lady working on this with none of the distractions we have today! Many took great pride in learning to write so beautifully, as a mark of accomplishment.


1824 - so much history has passed since then …..


The pages are all on beautiful watermarked paper which was later bound into this leather book.


How absolutely beautiful is this precise writing with its beautiful slant ….


Tranquillity indeed ….


I admit to doing full cursive handwriting when unhurried & I do my D the same way ...


 There are several different handwritings / hands in this collection of poems & notes & it is interesting to see the different styles of work


May 1859 - neat & elegant handwriting


1862 .... of the International Exhibition ...


Some German poems


Beautiful firm writing with good upstrokes ....


To love our enemies ...


Yet another hand ... not as bold as before with long strokes & beautiful curves


To the Mocking Bird ….


The binders where the notes were bound into their tooled leather book ...


 It is hard not to be envious of such beautiful handwriting & such a lovely book. It is a rare find to have a monogrammed book of such age & I am still on the lookout for one with my initials D S, in the meantime I continue to appreciate & enjoy my many leather books, appreciating their workmanship & beauty. They take pride of place on my bookshelves ...

Please tell me I am not the only book hoarder about? Do you still buy new books or own beautiful old ones?

Thanks for stopping by, I hope you have enjoyed this book as much as I have. Leave a comment so I know you have visited.

Dee ~♥~

Monday 24 March 2014

Fabulous vintage fabric

The cold weather has rather curtailed most activities as cold & damp is not my preferred combinations but I did manage to get out & about to some local thrift / vintage shops & my trip was rewarded with some fabulous vintage fabrics.


How fabulous is this pile of fabric? I just know that I will be using them for Gentlework very soon & for making some little lavender bags ...


This green fabric is very traditional; I have seen similar patterns & texture in many vintage items ...
 

These two are very traditional with a soft, worn feel to them


Pretty pinks with lots of flowers & patterns


Everyone needs some of each colour & even though orange is not my favourite colour, some will be useful


I rather like this selection of mainly vintage fabric - a good find me thinks!!


Such gorgeous fabric is meant to be shared so I separated it to share with my friend Ellie because she loves Gentlework as much as I do since we did our sewing day together.


Have a fabulous week & hope the sun is shining & it is good weather for you.
Dee ~♥~

Saturday 22 March 2014

My Gentlework letter holder is finished ...

Spring has sprung & the weather has turned ... wintery. Perfect for settling down inside by the fire & doing some stitching at night.

I mentioned my recent discovery of the gentle art of Gentlework - the creative use of fabrics & stitches all done by hand to make panels, brooches & anything else that inspires you.

On my sewing day, I had hoped to make a letter holder for precious letters from my late Mom but that was a little too ambitious for a first project so I was content with a fabric panel instead. However it was still in my mind to complete the letter holder / store so that was always going to be my next project.

Rustic & White had some gorgeous Tilda fabric pieces & I bought some bright colours - mainly pinks & a pretty green - that I liked.  These were my first choice for inspiration.

This is how I started one evening - cutting out bits of fabric, pinning, moving & finding the beads, buttons & bits I wanted to embellish with ...


As you can see - it did not stay like my original plan as I changed it about. That is why I like to pin & move things about ... Are you a planner & pinner?


I had one of my grandmothers vintage lace cloths that my Mom used to use that was the perfect size so that was to be the background fabric. I backed it with soft blanket-like inter lining for curtains, machine stitched it to the cloth edges then was ready to start hand sewing.


I decided on some pretty crochet bits for the bottom & a tree shaped one that framed the image perfectly.


I would love to say I had a pattern in my head, but in all honesty, I just added bits, cut, trimmed & stitched until it took shape & balance.


A flower shape didn't quite work once it was stitched but then I decided to add bold pink buttons to it & am pleased with the texture of it.


A small round doily (one of my grandmothers) was used over a bright pink patterned fabric then beads added for some 'bling' ...


Ellie who did the Gentlework day with me, dropped off some fabric she had & I found a piece with the pretty hearts - perfect for the fold over cover piece - thanks Ellie! The main fabric was one that had been used by both my grandmother & my mother so it is a link to them.  Both of them also loved sewing & crocheting so all the elements honoured that too - a special piece.

The piece hovered between stages for a couple of days as the centre needed something but nothing seemed right till I popped into Jo at Rustic & White & found the perfect pink & green Tilda flower fabric ...


Lots of hand stitching, beading, buttons & bling & it is complete after a weeks worth of stitching work. Looking up closely, I know I still have to get my stitches more even & precise but that will come in time (or so I tell myself)

So my letter holder is finished - in cheerful colours & it will be used to store my precious letters from my Mom ...

Thank heavens for letters - emails are just not the same & can't really be stored to be reread & enjoyed.  Do you keep letters too? How do you store them?

Thanks for stopping by, always enjoy reading your comments & clicking on your links to return the visits

Dee ~♥~

Thursday 20 March 2014

Welcome Spring

After a long, wet, grey Winter,  it is officially SPRING.

This is the section in my garden where all those potted bulbs are planted out that we all buy when we are desperate for colour: Hyacinths, daffodils, crocuses, grape hyacinth & tulips all share the space to provide a riot of colour ...

 
The sideboard in our conservatory has also been changed to more colourful items - stunning pink IKEA lantern & candle holders, share the space with Giselle Graham glass plates & some vintage uranium glass items that really glow in the bright light ...

It makes you want to linger over meals & enjoy the view of the garden!


I have even found some cheerful Spring-like vintage fabrics to use in new Gentlework projects ...


So HAPPY SPRING DAY from my home to yours, for those of us starting Spring today - hope yours is a colourful time too!
 

Thanks for stopping by, reading this & taking the time to leave a comment so I can return the visit.

Dee ~♥~

Monday 17 March 2014

Making a new noticeboard

I shared in the previous post the process of using 3 random items at home for a new look for our entrance hall.

We always use the entrance for notices or messages but the little magnetic board was not quite right so I knew that a new noticeboard was needed.

I had made a noticeboard for my bedroom so I have some experience with how to do it. The frame was a dated gold picture frame that was a good size so I took the backing board off; painted & waxed it at the same time as the little table & picture frame.

I have been asked several times how I do the noticeboard so this is my version


The picture frame backing board was padded with some wadding. The easiest way is to use a glue gun & to stick it to the board edges. I used a neutral interlining to cover the board because I love the soft feel  & colour of it.

I always like to plan my ribbons by cutting a sheet of paper the right size then working it all out.


I had a few different ribbons so I worked out the pattern, measured it to keep it straight then hot glued it to the edges to keep it in place.

Because the backing board is thin hardboard, I knew from experience that the tacks would come through the back, so I worked on a wooden board, pushing the tacks all the way through to the back before securing them with a good blob of hot glue on the back to keep it in place.

The backing board was secured back into the frame & it was ready for hanging.


It is the perfect combination & now serves a really useful purpose - up cycled & serving a good purpose now.


Thanks for stopping by, for reading this & for taking the time to leave a comment. I hope I have inspired you to try something different.

Dee~♥~

Sunday 16 March 2014

Creating a uniform entrance hall with Annie Sloan paints

We have a little entrance hall between the front door & the inner doors which is just large enough to pop down post & bits on the way in or out.

I move it around from time to time because it has not felt quite right - you know that feeling when it is needs tweaking.

I decided to bring back the little hall table which had been relegated to the summer house in the garden.

I knew the creamy colour had to go so decided on 'Paloma' by Annie Sloan - a warm neutral colour that I knew I could live with.

With these projects - one thing often leads to another & so it was with this. The table looked lost on its own & since I was going to paint it anyhow, I browsed my loft & found a vintage wooden mirror / picture frame that I bought because I loved the shape but then didn't use. I took it down & decided that it would could work as a portrait shape … progress.


We always have a magnetic / noticeboard there too for messages so I looked around and found a dated gold picture frame that was just begging to be altered - sorted, all could be painted together.


The picture frame backing needed to come off as it had two vintage pictures in that had to come out, I had some hardboard bits cut for the space instead.  The frame was held in by some really old nails …

I painted all in Paloma then put a clear wax over & once that was buffed up, I brushed on the dark wax over the raised details to give them definition. Much improved.


The little table was done the same with dark wax on the turned details too.

The dated gold frame was painted & waxed to match in anticipation of it becoming a notice board.

Great improvements with things we already had but just needed to combine.


I have found that Annie Sloan paints make it much easier to change furniture so that it is something useful - especially useful as no undercoat, rubbing down or tedious preparation is needed. Are you a chalk paint convert?

Thank you for stopping by, leave a comment so I know you have been.  I hope you are inspired to do a little decorating too,
Dee ~♥~

Wednesday 12 March 2014

Our Gentlework is all complete ....

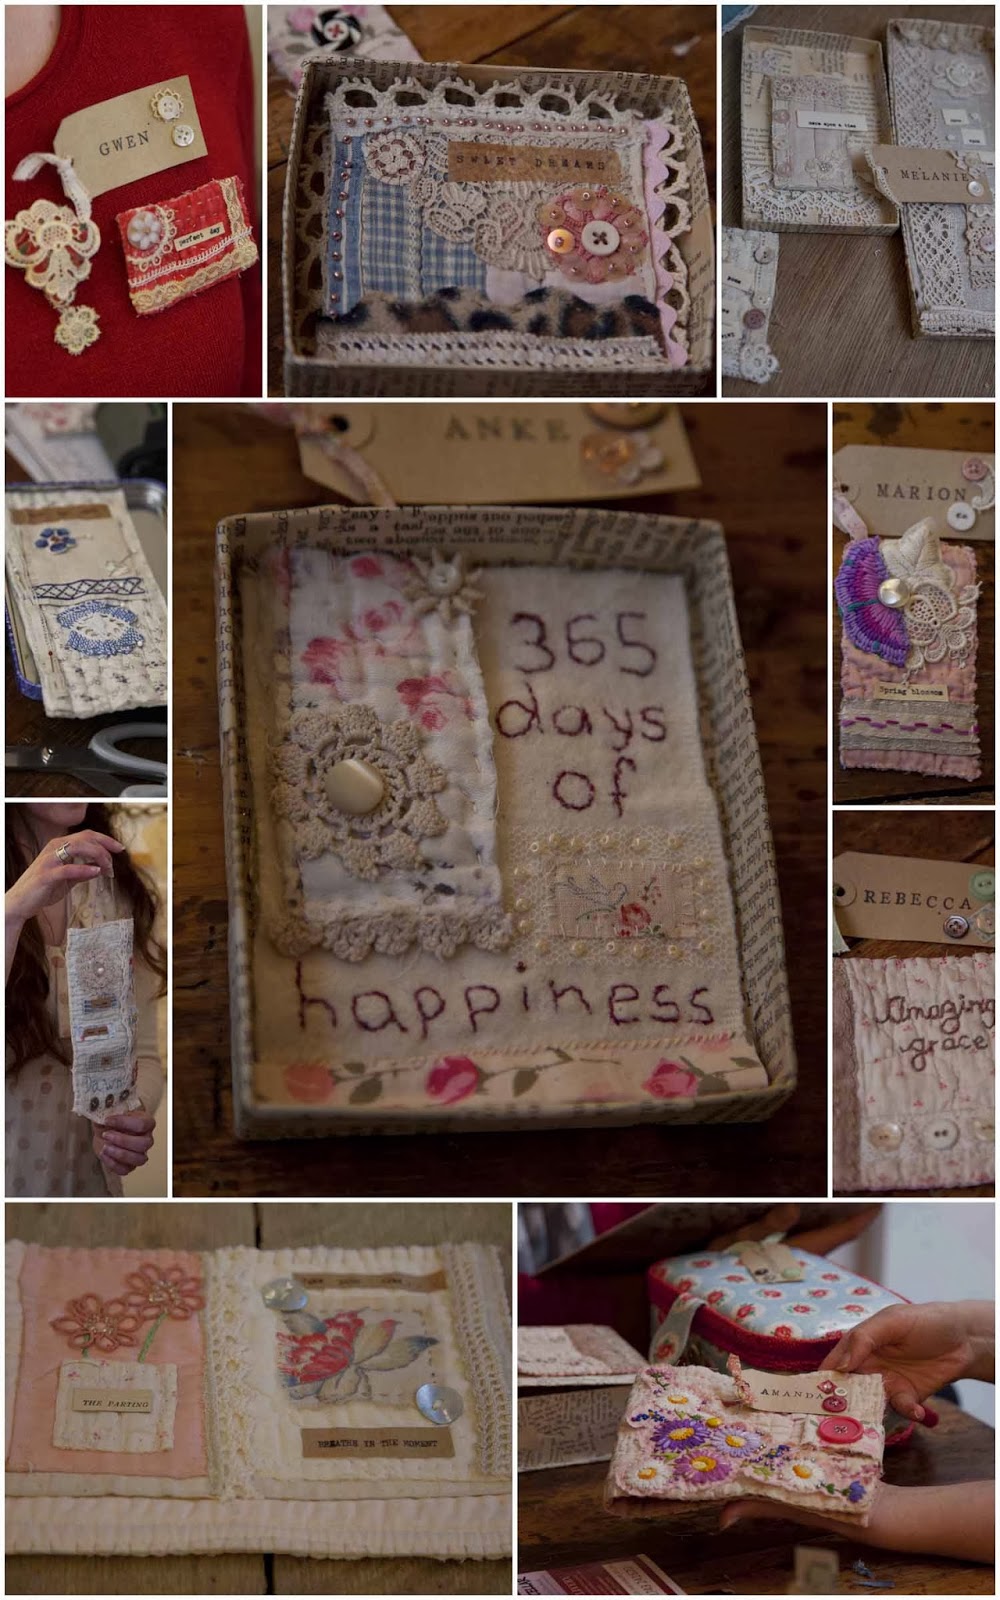
I am so pleased to find so many lovely comments & feedback on the hand sewing Gentlework posts that I will show you the stunning items made by all 10 of us on our day course.

The fabulous workroom at Rustic & White - such beautiful things everywhere


Some of Christine's Gentlework to inspire us ...


Just some of the selection of vintage fabric, cottons, lace, beads, buttons, blanket backing & embellishments brought along by Christine for the workshop


With so much inspiration it was soon busy hands all working away ...


The workroom is an absolute joy to work in


10 pairs of hands, all the same fabrics to choose from; 10 very individual items ...


Just about finished in our 6 hours ... Christine casting her eye over our work!


 The 10 finished items ... from little hangings to brooches & a needle bag


All the photos shown here were taken with my Canon 5D mkII with a 24-105 lens so please ask if you wish to use them.  I am photographing a friends wedding in May so am getting in lots of extra camera time ....

I hope you have enjoyed this sewing series with me - if you are interested & can make it to a Gentlework sewing day, I'm sure you will enjoy it as much as I have ...

Thank you for stopping by, leave a comment so I know you have enjoyed your visit,
Dee ~♥~

For Lainie - a cropped image of the writing stiches - I hope this helps x