Tuesday 30 May 2017

Bringing some loveliness to an old sewing box ...

Hi Everyone

I believe your home should reflect who you are & be filled with things you love & that you love having around you. Your home is your space, your sanctuary so you can please yourself with your decor.  I change things around often because that is my personality ...

I am enjoying the final half term of this academic year - where has the time gone? I always love to have a project or two to work on.  Some will remember the sewing box I updated some years back so that it fits in to the living room.

However, I saw another, more compact vintage one with a solid lid that I thought would be good in our conservatory where I often sew because of the lovely light in there. However, the dark, dated wood was never going to woo me because our conservatory is light & bright.  The red corduroy fabric with date trimming had to go but it is solid so that is important.


I stripped the fabric out, sanded the glue & previous fabric remains off, then wiped it all down, ready for the next step. 

I always keep a supply of my favourite Annie Sloan Chalk Paint at home so I am always ready for a project. I did an Annie Sloan painting course to learn the techniques some years back & it gave me the confidence to just pick up brushes & do it .... 

My roll of corrugated cardboard is always used to protect our table because I like painting at eye level where possible. This sewing basket has a shallow drawer too which is good. 

Mmmm I will be needing another tin of Annie Sloan Old White paint soon as well. 


First coat done, however, this dark furniture often has a shellac varnish which sometimes bleeds though the paint - this is going to be one of those projects that need a few coats of paint.


Better coverage with the second coat - it is looking brighter already!


Because the sewing box will be used in the conservatory, overlooking the garden, I decided to do some decoupage on it too.  I had found some lovely serviettes with hydrangeas on them while out & because they were in my favourite colours,  I knew they would be perfect.  I am an advocate of life long learning  did a local decoupage course so I knew the techniques I needed. 

Lots of colour but this is a project that can be fun - I am loving the pinks on the lid ...


Why stop at the top - the drawer was painted in  Annie Sloan Henrietta which had been lightened with Old White  - mainly because my Old White was almost finished & this was a way around the problem & because it would fit in well anyhow.


I was on a roll & decided to decoupage the inside of the lid too. I used my hairdryer to dry the layers of Modpodge on the images. 


I usually wet distress (wiping off some paint while still wet with a finger or a cloth) but I decided to sand this one to distress (a messier process .... )


Time for clear wax to protect the surface ...


This process can't be hurried ...


The change from dated to colourful ... 


Ready to be used to contain all those bits which are needed for sewing projects - I know this will be perfect because it is both functional & beautiful & that is what I demand from things in my home.


I always love to have a half term project & this has been a good one which used several of my skills - that is why I do courses .... 

Thanks for stopping by & spending your time with me, 
Dee ~♥~

Sunday 14 May 2017

Planting up some salads ...


Hi everyone,

Do you find that this time of the year brings lots of post winter jobs at home?  It has been quite dry in the Shire so weeding is not easy until we have had some decent rain.

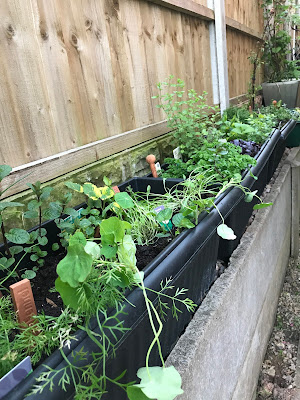
I shared my herb trough clean up with you & have now added some additional ones that didn't survive winter. It is looking much more lush & I look forward to using them because I really prefer fresh herbs in cooking. I have also planted some nasturtiums along the front of the troughs because they are lovely in salad too. Can you see the silver platers to the far right? They were one of my jobs too as they are past their best.


I love growing some salad leaves & other bits for summer. I usually just grow a few small trays or get some from our local farm shop but this year I decided to grow some in troughs too.

A trip to the garden centre to get additional herbs & I came away with these two narrow troughs which I thought would be fine. I planted them up with small plants I had bought.


However, I soon realised that these were not quite right & I decided to look for something else. Most garden centres stock large wooden vegetable planters which are unsuitable as they would take up too much space ...


I saw some reasonable height recycled plastic troughs by Elho on the internet which would keep my vegetables elevated & hopefully away from snails & slugs. They seemed like a good solution & would look right along with my other planters ...

The added bonus of this system is that it can have an additional grow house / covered propagator clear cover to protect plants in cooler weather (and perhaps keep out bugs too).

However, a trip to my local hardware shop ended in disappointment as they didn't stock the system. An internet search revealed that a branch 17 miles away had 'limited stock' of these planters so an early visit the next morning ensured I had the last 3 remaining ones. It was worth getting there soon after the 7am opening as I came home with 2 black & 1 green trough - they were the last ones in stock so I had decided to put the green one alongside the green waterbutt & the other 2 under the kitchen windows.


The newly planted vegetables being transferred to the better planters ...


Coloured swiss chard at the back, radish in the centre & various lettuce in the front of the two black ones ...


The green one looks just fine alongside the waterbutt - this unashamedly contains only lettuce & various leaves which I use for salad daily. I am really looking forward to having a good supply right outside the kitchen door. The plants underneath are for some container colour on the patio ...


The advantage of sticking to one colour for all our planters / pots means that they all seem to blend in against the house ... 


 While adding some additional herbs to the side troughs, I realised that our black, red & white currents were still in silver metal pots which no longer looked their best. Time for a quick trip out to get some shorter square black ones I had seen earlier in the week ...


The lower pots are very similar to the herb troughs & it looks neater & more uniform.  I picked up 3 large 55 litre bags of compost which as you well know, weighs 55kg each. After manhandling them in to the 3 new raised vegetable planters & the 3 new tubs on the wall, I was glad as each bag lightened up - heavy work. I mixed in some compost from the small bags which expand & which retain water too ...


Much better to look at & much neater too. The various currents are in bloom with fruit forming  ...


I am hopeful of a good crop of salad things in a few weeks because the planters benefit from a protected, sunny spot against the house. I have ordered their plastic lids which will hopefully mean I don't have to share the spoils of my hard work with slugs & snails ... 


And an update - all 3 lids have arrived via Amazon - yay, I will not be sharing my salad greens with birds or slugs ... 


Hopefully my regular hedgehogs will help keep them under control too ...


What is on your to-do list at home? Do you have a long list of things that need doing?
Thank you for stopping by & taking the time to read & leave a comment.
Dee ~♥~

Sunday 7 May 2017

Making a fabric basket cover

Hi everyone, lovely to see you all here, I hope you are enjoying life wherever you are.

I work with students who are educated outside of mainstream. One of my lovely older girls asked me to teach her to do some baking so we agreed a morning & I packed up the things I would need in a basket with just a tea towel.


It was the first time she had used a hand mixer but her Victoria sponge (made with guidance) came out very well.  It is one of my favourite cakes so I am happy to pass on the skill.


I decided to cover the basket with some cheerful fabric as it is also used for picnics ...

I already had some really lovely fabric & everything else so a free morning was all that was needed. I have made covers for baskets before so knew what to do.

I measured how long I wanted the sides to be from the base in the basket ...


 It is easy to just trace the shape of the bottom of the basket, then cut it out with a little extra to get the right shape for the base of the basket.


Long straight machine stitch was all that was needed to gather the fabric to match the base shape, pin it in quarters to make it easier ...


Pin the gathered section to the base section then stitch all around. I did a zig-zag on the edges to stop them fraying too ...


I had some fabric left so made 2 bags to carry the lose things in the basket for picnics ...


A morning well spent because the basket is now really cheerful for summer ....


Much nicer & it can be taken off easily for washing ...


Thank you for stopping by & taking the time to read & comment.
Dee ~♥~

Saturday 6 May 2017

Tidying up the herb troughs ...

Hi everyone,

As much as I am willing warmer weather to arrive, it does not stay for any length of time & I am still layering up everyday.

Are you a fresh herb lover?  I like cooking & prefer to cook from scratch using fresh ingredients without preservatives & like using some freshly picked herbs for cooking, salads & for water.

I have a little herb selection that grows in troughs on the raised bedding between us & our neighbour. There is a service pipe that is in the raised bed so everything has to be able to be lifted off if need be.

The other advantage is that these planters are close to the kitchen door so it is quick to pop out in all weathers for fresh herbs & they can be covered with a long horticultural fleece strip in cold weather to protect them from frost.


 The planters enjoy a sheltered position between the wall / fence & the house which suits them.


I have 2 sets of terracotta herb markers which are brilliant because you know exactly what you are picking & the advantage is after winter, you can see what has not survived & needs replacing. The markers are also handy if someone else pops out to get herbs for cooking because it takes the guess work out of it.

No sign of the fennel & chives ...


A little clump of parsley won't be enough so a few more will be needed.


 My chamomile (used as a tea) & the dill has not survived.


This angelica was a gift from my friend Kathy - that is looking very healthy already.


Thyme is always hardy - it needed a trim as it was a little woody.


 Lemon balm is lovely in food & a few stems are refreshing in cold water ...


The trough that is tucked behind the hedging plants for shade, contains various mint plants. They are our most used herb in summer & the various ones are always interesting - chocolate, pineapple, spearmint, peppermint etc


The troughs have been topped up with fresh potting soil & a feed so hopefully they will soon be at their best again.

I have a list of plants I need thanks to the markers ....

After cutting back the rosemary which is a little woody, I stacked some more wood in my chimnea on the patio & added the rosemary cuttings to it. They will add a lovely fragrance to the air when it is lit.


A very pleasant afternoon & a job well done. Which herbs do you use the most? Which can you recommend for the gaps that I am not yet growing?

Thank you for stopping by & taking time to read & comment.
Dee ~♥~