Showing posts with label sewing. Show all posts

Monday, 27 July 2026

Making a quick sewing case


I do rather love a neat sewing case because I have needles for various activities like hand sewing, beading, embroidery, applique, scroll work etc. 

I often gift needle cases too, like this one. 

Everyone needs somewhere to keep their needles safe & if it is both functional & beautiful, then it is even more special.


I  will be doing some travelling in the summer that requires a bit of planning for an event & I like to  be prepared with a few needles & threads because they are generally needed (seldom by me)

Rather than moving needles from one of my needle books, I found two fabrics from my stash & a matching bit of felt. I also had the fabric strip to use as a tie, & I have loads of vintage buttons from Olive. 

This is my most used little needle book I made a few years ago.

 The fabric applique was part of a 'making zen' workshop I did & it is my favourite needle book - filled with all kinds of needles I use regularly, many with sashiko type needles with a large eye that glides through fabric. 

Needle books need to be functional & not too big so I cut out the size I decided on as well as a piece to use as a little pocket which had a hem sewn on the one side that would be open. 

I pinned the fabrics right sides together, did three sides & left a turning side, then found the pocket was wrong way up. Does anyone else have these moments when you can't decide which way something has to go so that it will turn through the gap the way it is supposed to? 

I trimmed the whole thing all around the edges, taking out the line of stitching & then pinned the pocket again. I pinned the edges then did a quick turn to sort out the right way for the pocket before sewing all around the edges, except for the turning out section.  

It was a relief to turn it out & find it was the right way this time. 

I cut a piece of felt to fit in the gap, then machined the turned out side, enclosing the edge of the fabric tie strip. 

I found a button that would go well & hand stitched it on. 

The important bit is the felt parts that hold the needles. After the needle case was ironed flat & folded in to the thirds so one would cover it all, I cut 2 pieces of felt to go in the two thirds part. I did a quick heart shaped template for the one in the middle, drew a line with a heat erasable pen then machined the felt on to the fabric case. 

I am rather liking the pattern contrast  & the little pocket is useful for some iron on hemming web (for those of us who seem to lose a trousers hem) and some threads that will go with most things.

 A few safety pins are always needed (usually for a blouse that is too low) and the little needle case is ready. 

Who else has various needle cases for various projects? 

Tell all. Thank you for stopping by, it is always appreciated. 

Dee 📍🪡

Sunday, 10 May 2026

A creative week at Making Zen


I am naturally a creative person who loves the quiet time of making things that do not have to have a purpose at all, other than to bring joy to the maker.  

I took art at tertiary level & always found the drawing side to be more challenging than the making side. 

My Mother & Grandmother could turn their hands to most sewing projects & I am comfortable with 'just having a go'.

I love to join the online 'Making Zen' retreat run twice a year usually because it exposes me to new skills that I might use in a different project but the skills are never lost. 

These are some of last years projects from the Making Zen retreat -  

Sewing a pouch with a gusset 

Weaving with intention 

Making a tsunobukuro style bag

and some previous ones 

Using new stitches to make a baobab tree 

Using water soluble film to make a new fabric 

Stitching some little zen bags 

I do not subscribe to the (bought) VIP package, but print off the workshops & handouts & make notes along the way to help me remember the techniques further down the line. Each unpaid one is only available for 24 hours which galvanises the mind to concentrate on the techniques. The ethos of reusing fabrics is a great one across all the workshops & the tutors all encouraged it. 


Meredith Woolnought, who did the reverse applique technique I used previously, had an interesting workshop on negative spaces. It was a paper activity that has many practical uses. It is not something we think of too often, the spaces between that define an image. Her workshop used a background circle & then torn or cut paper to create an evenly spaced work. I had a travel brochure at hand & decided to use that while she was demonstrating. 

I did a second one with another 2 pages from the travel brochure but was drawn to the words on the article so I cut them out & it then became like a journal entry - a very interesting concept that can be applied to journaling I think. 

The Stitchers pocket companion pouch by Giovanna Zara was not as straightforward as the tutors expert work, but I used fabrics 

I already had & it was passable. Short cuts seldom work & the machine stitched sides kept bunching up in the bobbin & I had to then oversew with blanket stitch anyhow.

 I should have just done the hand sewing instead of using the machine. You live & learn. 

Many of us were looking forward to the workshop by Claire Voelkel-Sedlmeir where she made wishing houses to hold intentions. 

I told you these workshops are totally self indulgent & zen at the same time. 

It uses a 4x8 inch scrap of cloth that is embroidered, stitched & then folded over. 

I had a piece of vintage lace out so used that for the roof part then got totally carried away with the stitching on the front, a cottage covered in rose blooms. 

It was a fun one to make & her lettering advice was very helpful indeed; I find my lettering is not as neat as it should be but that is simply a lack of practice.

I am always extremely grateful to the inspirational & diverse workshops offered & the new skills I learn. 

I hope I am not the only one who believes in life-long learning & honing in of skills. 

Thank you for stopping by, it is greatly appreciated

Dee 🏠🪡🧵📍🔖📝

Tuesday, 14 October 2025

A little sewing project ...

 I bought this protea fabric ages ago with the intention of it going with the woollen winter curtains in the dining room because it is the same oatmeal colour that is in the tartan curtains. 

However, it was lost & forgotten about until I changed the airy summer curtains to the heavy winter ones this past week & found the 2 meters of fabric in the curtain container.

It was still the long length that I had bought it in so it was hemmed all around to be used on the dining room table. 

Our Living-room has a vase of beaded proteas I bought in South Africa & another vase of silk ones that I am rather fond of so continuing the protea look across both rooms is good. 

I had bought some panels a while back & two of them had proteas right on the side. I decided it was time to make them in to two useful items for the sideboard & console table in the dining room but they could be used elsewhere in the house too. 

I didn't want the large size of the panels so I cut them down to a size I wanted, cut heavy cream backing fabric too. The two parts were ironed very well,  then I took it to the machine to be hemmed. 

The corners were pinned & I left a gap in the bottom edge for turning through. After stitching all around, I trimmed the corners then turned it through. 

It was again pressed very well & the bottom gap was pinned. I top stitched all around, close to the edge so I caught in the gap, closing it with the top stitching. 

More pressing then they were taken to the dining room where the cream, pink & greens look rather nice. The oatmeal protea table cloth picks up the same colour in the pattern of the heather colour in the tartan curtains. 

I don't know why I have put off hemming them all because they fit in well. 

Who else buys lengths of fabrics as table cloths? Our conservatory table extends & bought cloths are often the wrong size so I hem fabrics I like for there. 

Thank you for stopping by & visiting, it is appreciated. 

Dee 🧵🪡📍

Thursday, 28 August 2025

Experimenting with reverse appliqué

 In the past week I have seen the sewing technique of reverse appliqué demonstrated by this sewer.

It is a new technique for me & I was keen to have a go. This week my social media memories popped up of a visit to Transylvania 3 years ago. 

While in Romania at Bran castle, I photographed an art piece with winged angel shapes.

I drew it then scanned it onto tracing paper (glue tracing paper on printing paper by just dotting a bit of glue on each corner so it goes through the printer.)

I cut out 4 different linen fabrics, then tacked them together around the edge to keep them together. 

I pinned the traced sheet on to the top layer & then sewed on the lines with black no 8 Perl cotton. Because of the 4 layers, I could not do a long line of stitches because you have to stitch through all 4 layers. I worked out that back stitch was easier most of the time. 

Once all the lines were done, the tracing paper tore away easily to reveal the black lines. 

The technique is to cut the sections through the layers so I cut 1layer on 2 wings to reveal blue linen, cut through 2 layers on another 2 wings to reveal pink linen, then the last 2 wings were cut through 3 layers to reveal the dark brown linen. 

Linen doesn’t give sharp lines but it is effective & a technique I would approach it differently next time by tracing the outline on a light top layer instead of using tracing paper. 

That should make the sewing lines neater & give a sharper edge. 

I will try another one as it is an interesting technique with creative possibilities.


Have you tried .this & what hints do you have for me? Thank you for stopping by & supporting my blog, 

Dee 🏰🪡📍

Tuesday, 29 July 2025

Experimenting with flex frames for pouches

 Summer time away from tutoring means I can spend time just playing with the sewing machine & trying out things I have had in my mind. 

I did some book bags from my Making Zen workshops in May & I loved the fabric combinations of the peacocks & blue roses, with a pale green fabric lining as well as the script fabric that is a favourite. 

I looked at the fabric bits this morning & remembered buying some flex frames some months back that I thought would be useful in little fabric purses or pouches. 

Mine were from Ebay, sold as 'metal internal flex frames' & are available in various sizes. These are about 3.5 inches long. 

Because I had not used them before I had to make it up as I went along. 

I cut 2 peacock  sides, 2 thin green lining sides, 2 script pieces to use as the channel for the flexes. 

I hemmed the 2 script pieces on the sides so the sliders would glide through, 

I assembled it ready to sew - the peacock fabric right sides up, then the narrow script channel laid on top of the first fabric, then the lining & sewed through the 3 pieces along the top. I did both sets of 3 pieces. 

I opened it up, lining up the peacock fabrics with the lining together, & the channel pieces were to the patterned side, away from the side stitching. 

I started on the bottom of the lining, leaving about 1.5 inches to turn it all through. I stitched all the way around, ending again at the bottom but leaving the opening space. 

I turned it through the opening, ironed it flat then I machine stitched the lining space because this was a test one. 

 I inserted the flex frame & had to bend the little metal part over the base to hold the pin in place. 

To improve on,  I would make the channel thinner & narrower. The channel fabric words were upside down - something to be aware of next time. 

An interesting learning curve as I have made little pouches with a channel but put in string so this is something I will try again (I also have another 9 flex frames in the pack so that might inspire me)

Is this something you have used? What tips can you share? 

Thank you for stopping by, you are always most welcome to share & comment. 

Dee 🧵🪡📍

Sunday, 27 July 2025

Making Zen - a tsunobukuro style bag

I am enjoying doing some of the creative work from the May Making Zen workshops. These were the previous ones  I did recently: 

Weaving remnants with intention 

Sewing a pouch with a gusset 


On a lazy Sunday, I got to one I have been wanting to do, this tsunobukuro style bag for holding a small notebook, art on the go, a journal etc. In the workshop there was a notebook to go with it but I decided against doing it, I might still. These bags sometimes have a tie on the top or shoulder bags, mostly just a medium weight fabric  ... 

The bag construction is both simple & intricate. This is my paper template I made while watching the workshop. You start off with your rectangle, have the fold towards you. 


If the bag is not lined, it needs to have neat edges so I decided to do the lined bag which I thought would be quicker. 

My outer & lining fabric was 24 inches by 8.5 inches. 

I sewed them right sides together, leaving a space on the side to turn them through then handstitched that closed & pressed the fabric edges. 

With the fold of the rectangle towards you, the fabric is loosely folded over in a crossed over shape with about 4 inches between the folds to form a V. 

Crease the bottom fold then bring the left hand side over to meet the middle part. PIN in several places to keep that shape.

Flip the fabric over & bring the second side to meet the centre, pin again. This should now form a rectangular shape that is taller than wide. 

It can be sewn together in 2 ways - on the inside by hand or machine, starting at the corner & just to where the side flaps meet the main fabric. 

I did the patterned one this way. Turn right side out & lightly press. You can add a fabric / ribbon tie if you wish. 

For the second one, the construction was the same, it was machined with a lining fabric, but I joined the folded in sides with a blanket stitch and pearl cotton no8 on the top. 

This was quite tricky & I caught the inside fabric near the corner, but I did not unpick that little stitch. 

I personally prefer the patterned fabric but will make the machined seam bigger next time to reduce the bulk when it was pressed through. 


It is an interesting project that took me longer than I thought even though  it was an easy sew. 

I hope you will be inspired to have a go at one of these interesting bags. What would you use yours for? 

Thank you for stopping by, you are always most welcome. 

Dee 🪡🧵

Sunday, 20 July 2025

Making Zen - sewing a pouch with a gusset ...

 Twice a year, life pauses while the Making Zen creative retreats are available on - the online workshops over 5 days are a creative wonder because I am exposed to new techniques that I did not even know existed by fantastic tutors online. 


This past one in May came at a busy time, but I printed off the materials list & saved the worksheets as they became available. I watch each day (4-5 workshops), make notes of the new techniques & do some I can fit in. They are available for 24 hours unless you purchase the vip pass. However, being time poor, I fit in the 24 hours & take inspiration from the new techniques. 


I often combine the techniques to make the most of it. What was really good was that all the tutors encouraged us to use what we had - make do & improvise; that is great for the environment. 

One of the workshops was using your fabric scraps to compose a new piece in colouring with your scraps. The tutor encouraged us to sort  fabrics, cut them up, rearrange them etc in to a unique new item with intentional use of colour & pattern. 

This was quite challenging to select with intention but I embraced it, recutting & re-assembling mine several times. I kept my colours to a  limited palette that I liked.


The second workshop was using a piece of silk fabric to make a pouch with a gusset to carry around sewing supplies when you are on the move. 

I decided to use the fabric from the 'Colouring with your Scraps' workshop that I had made as my base. It ended up on the pile, the unfinished effort willing me to finish it & today I finally had some time. 

I had decided on 2 shades of purple thread to go with the predominant colour & so it came downstairs to the conservatory table when I could work on it on the table protector where the threads wouldn't catch. The remit was to do some stitching over the joined fabrics, Sachiko or other & I used the variegated purple thread for that. 


I love just winging it, deciding where the stitching might complete a shape or add to the design. 

I used curved French seam stencils to give me some nice shapes. 

I use a heat erasable frixion pen  to draw lines on my work because a quick application of heat from a hairdryer or iron & the lines are all gone. Using a curved stencil makes it so much easier to get the shape you want too so you can concentrate on the sewing & get the result you want.  


The pouch was to be finished off with a gusset each side in felt & I confess to not having done one before so I consulted my workshop notes & the little drawing I did for help. I have a box of synthetic felt squares & found a colour that would go well with it. 

The top edge was first stitched, then the gusset was stitched to each side with a running stitch before the whole pouch was hand stitched with a blanket stitch all the way around. 

I need to add a closure to the pouch, perhaps a wrap around one to finish it off?  I am rather pleased to have ticked 2 workshops off the Zen retreat list (I had completed another 2 previously during the workshops) so this is a good result. 

As always, I am so grateful to the tutors who give up their time for these retreats. The video recordings, material lists & handouts all take their previous time & it gives so much inspiration. I have several more I want to do now that I am on my summer break.  What would you use this pouch for? 

Thank you for stopping by, it is always greatly appreciated. 

Dee 🪡🧵📍

Wednesday, 26 February 2025

Making some fabric baskets

 I had a lovely sewing day with a friend in South Shropshire last week & we made a sewing basket & some other bits. It is inspirational to bounce ideas off other creative people, especially as she is commercially minded.

 How lovely is my gifted pocket mirror? 


I helped by passing the scissors .. 


I love my fabric basket we made together. It has been some months since I did fabric basket & this refreshed my technique which was helpful. 

I decided that I wanted to make another one while it is fresh in my mind. I looked through my fabric stash & found some pieces of this blue Frieda fabric so I decided to do what I did with the red Frieda fabric previously. I joined the blue fabric in to a strip, adding in some matching plain blue fabric to make up the shape for use. 

I decided to make this one more rectangular with something in mind. It was lined, turned through & pressed. Since this is entirely for my own use, I did a decorative machine stitch around the top where it will be turned over. 

These two fabric bowls are going next to my sewing machines - one for the orts (all the snipped threads from hand & machine sewing) and the larger one for all the snipped fabric bits which will keep the sewing table neater. Orts

A great sewing project using up bits of fabric from my stash for much needed items. 

Is there anything on your sewing table? Tell all & thank you for stopping by, it is always appreciated, 

Dee 📍🪡🧵

Monday, 10 February 2025

Making new drawer hangers

 I had every intention of making a heart shaped hanger for Valentine’s Day for the sideboard. 

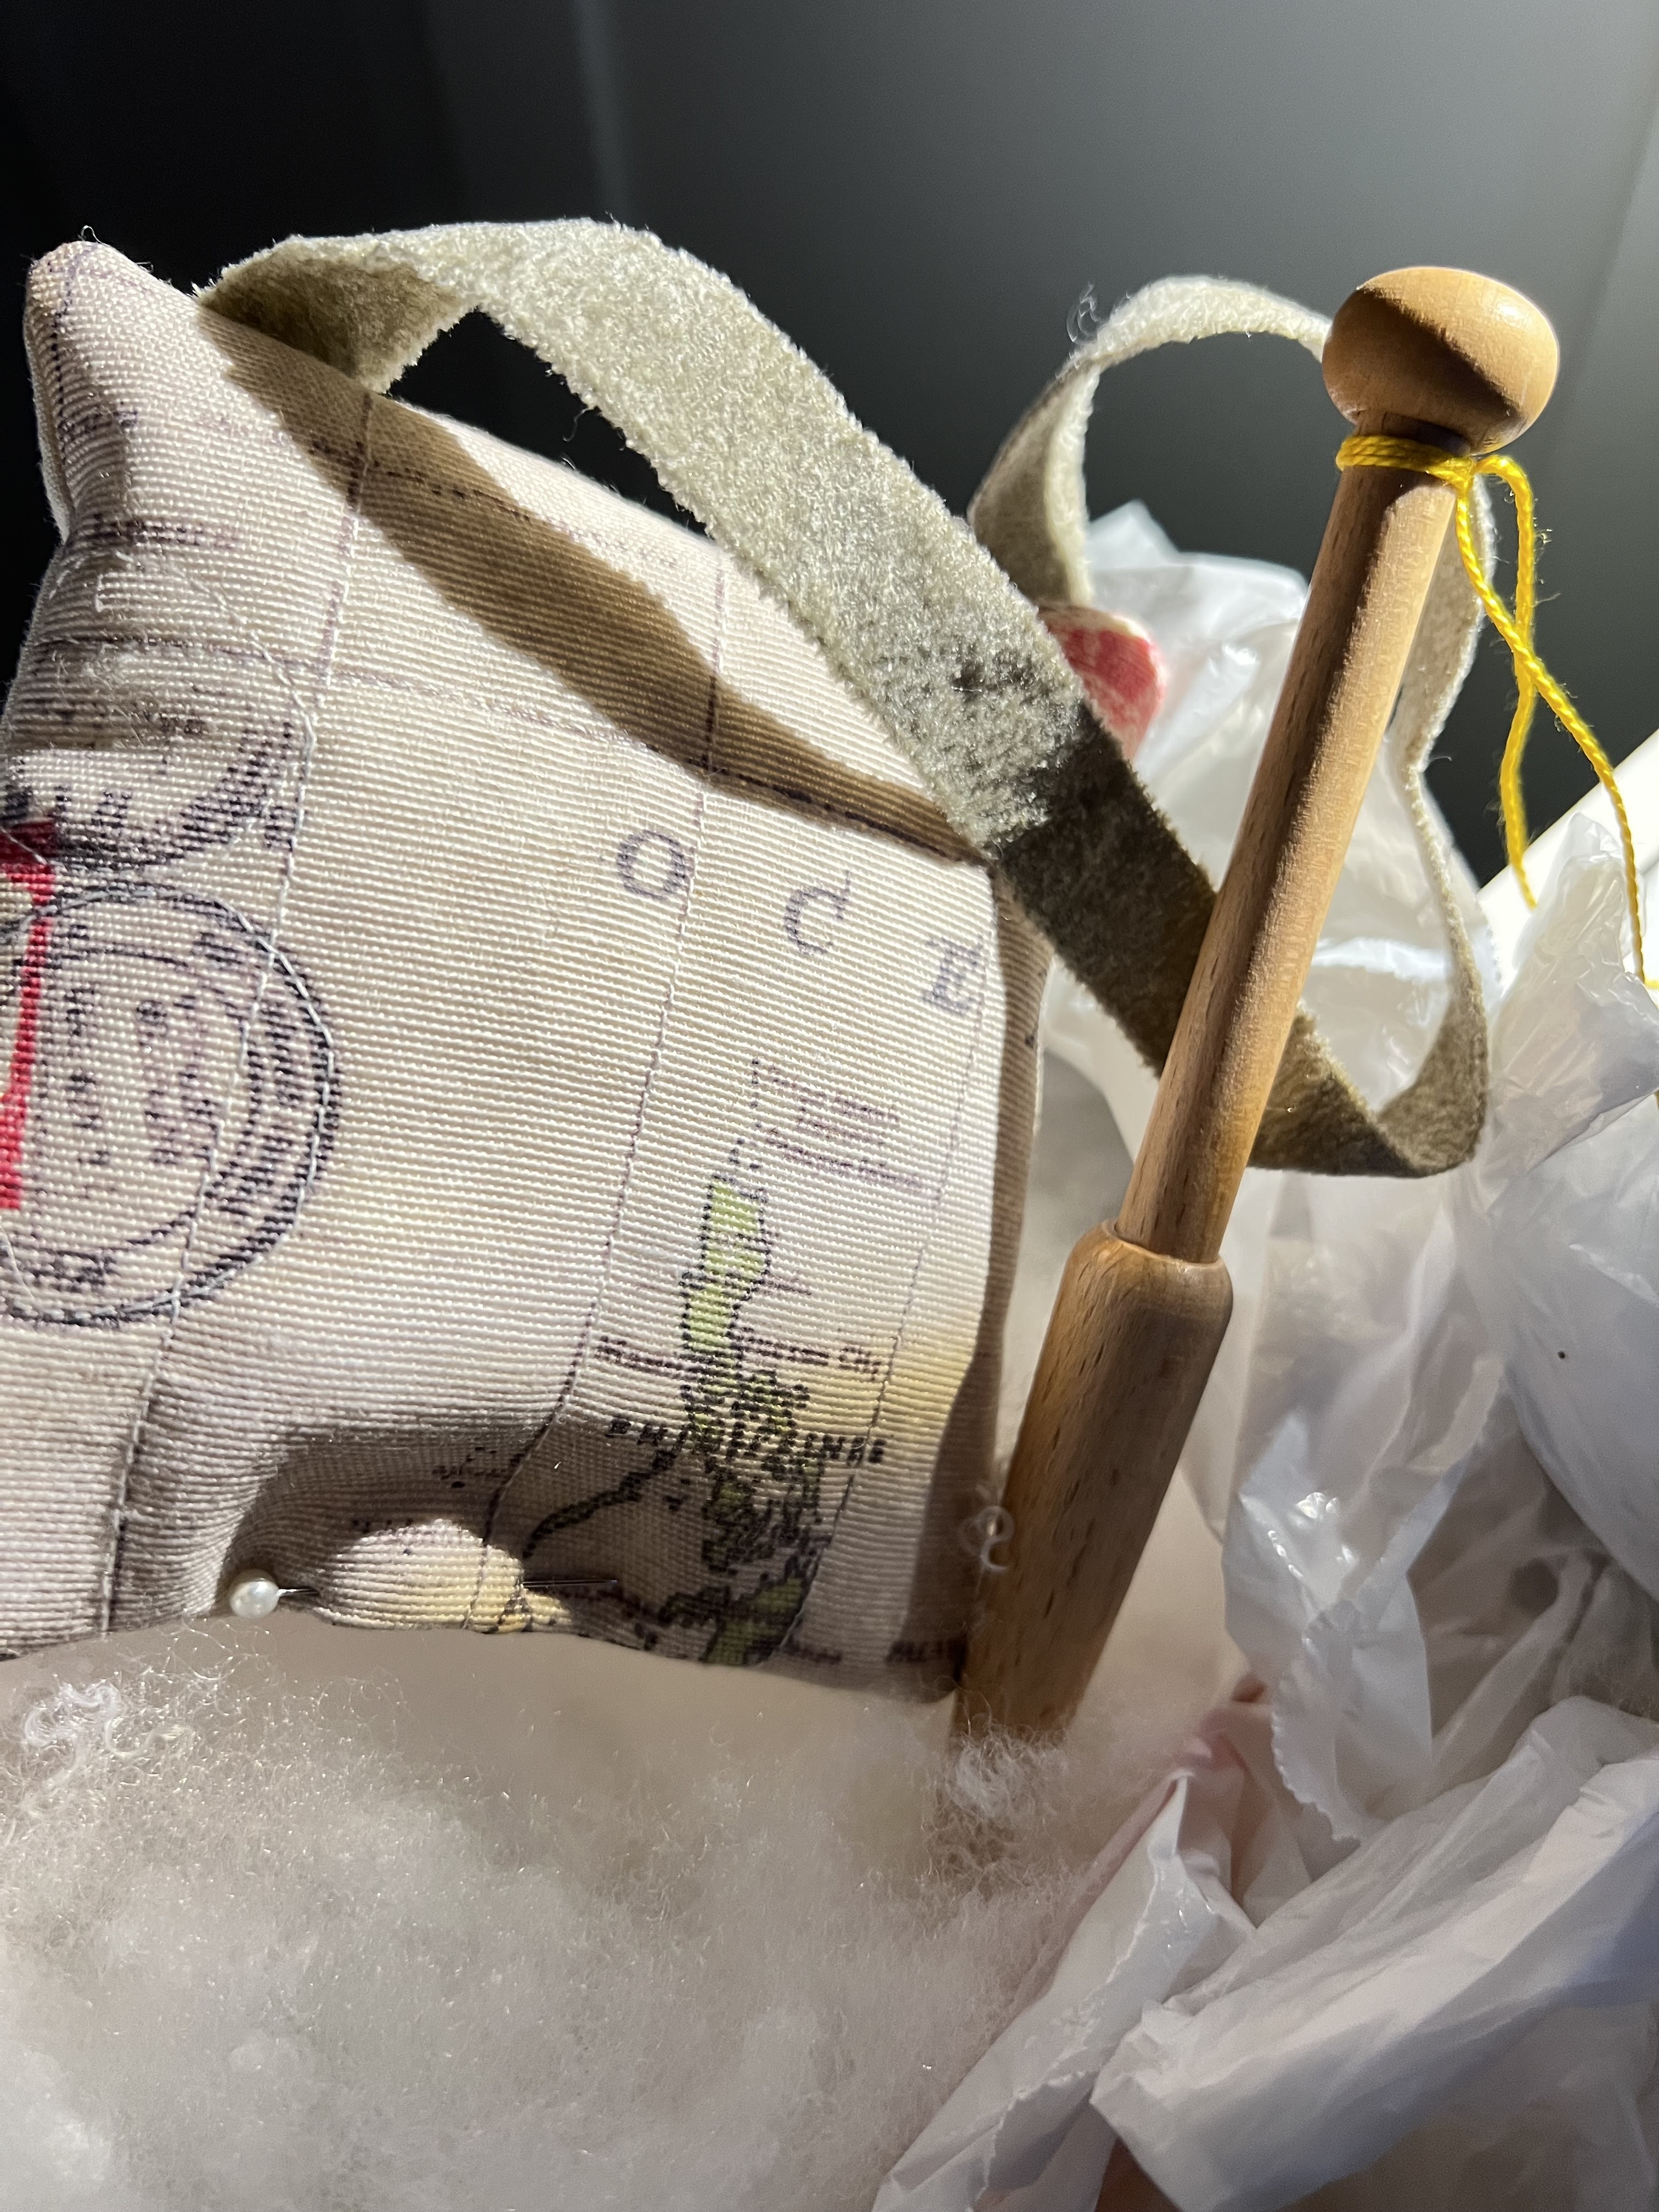
However, when I pulled out some fabric, my eye fell on a map remnant I had & that changed the direction of my sewing. I have always loved maps & this fabric reflects that love of travel. 


I decided to use the part map of Southern Africa & the Indian Ocean as the fronts for the hanger. I backed the fronts with a thin batting & machine stitched along the lines, pinned ribbon in place for the hangers. 

After pinning the front & back right sides together they were machine stitched leaving an opening at the bottom of each to turn through. The corners were pushed out gently to neaten them. This vintage wooden tool is great for turning corners & is much used. 

 They were lightly stuffed then the edges machined all around, closing that opening.  

All finished & ready for the door knobs on the conservatory sideboard. 

Are you busy with anything at the moment. Tell all, thank you for visiting

Dee 🪡🧵📍🧭

Thursday, 9 January 2025

Making a removeable fabric book cover ...


A new year & I am always ready to start a new project. My visiting cousin suggested that she would like to make a fabric book cover for her boring new diary. 

She had seen inspiration for one in a book I had put out for her to browse - 

I had seen one done in a recent workshop, though I did not have the time to make one at that time so I suggested we make one together following the guidelines I could remember. It is easier to do than to explain most of the time. 

I found a length of cream calico fabric that was large enough for both our books that were a similar A5 size. 


The technique is to lay the book on the fabric so there is about 3 inches to the side for the flaps. 

The fabric to the top & bottom of the book needs to be long enough to fold over the book with extra to join it up. 

This folded up fabric will form the backing of the moveable book cover to cover up the reverse stitching once completed. 

It can be trimmed to size but better to have more than less fabric. 


We laid the book on the backing fabric with the extra fabric around & drew around the open book to get the shape of the cover that will be needed. This is the part that we will add fabric bits to & embellish. 

It is easier to work on a shape & not adding fabric to the flaps would make it easier to finish of the completed cover because it won't be too bulky. 

We used a box of my fabric pieces & decided we were not going to overthink the selections - I was drawn to the pinks that I have used in other pieces, placing a few pieces that went together & then decided on 2 different pink threads. We started stitching & did not do many photos of the early process.  

A simple running stitch is your best friend because it can be used in many ways by varying the length, the direction, the width of the stitches etc. It is a very useful starting stitch. 

I overstitched all the edges to keep the fabrics in place & to give it a form that would be sturdy for the next stage. 

Slow stitching is the term used to describe intuitive stitching, just letting the needle & thread go where it wants to, you relax. It is a known form of mindfulness, because there is no pattern to be followed, no right or wrong, just intuitive stitching. 

Slow stitching is just going where the creative process takes you, adding fabrics & stitching in any way you feel across the fabric.  It is often stitching purely for stitching's sake, it does not have to be useful or functional. 

This is a very good explanation of that slow stitching is ...

However, in our case the stitching will be part of our book cover - the stitches give it more rigidity & structure so it is very useful.

After the stitching it is time to assemble the book cover.

I first trimmed the fabric - the backing for the main part comes from folding over the additional fabric to the middle & trimming it to size with a seam allowance for the joins. Iron to the centre, pin the two pieces & then machine stitched them. 


The tube shape is turned right way around & seams pressed flat. I decided that the side flaps were too plain so I stitched some vintage linen & lace fabric to make each flap. 


The completed cover - it is a snug fit but makes the notebook look a lot brighter. 


The inside slip in side sleeve with vintage trim. 


The completed cover in vibrant colours that will be well used. 


This has been an interesting project. I used limited colours because I was working with my cousin & didn't want to be bogged down in all the details. I love adding stitching & running stitch is very versatile, & seed stitch is useful for details too. I added a few French knots too. I chose to use only 2 different threads - pale & dark pink. 

Do let me know if you are tempted to make one too or if you need any further advice. Thank you for stopping by, 

Dee 🪡🧵📍📚